

After the kitchen renovation, the old ugly lamp finally had to go. The search for a beautiful new designer LED pendant light proved difficult, because an inexpensive pendant light with a simple and modern design coudn’t be found anywhere. Real designer lamps that cost over 800 EUR were simply too expensive.
But you know how it is, once you have a 3D printer at home, the question immediately arises: Why not print it yourself? And that’s what was eventually done! After countless hours invested and many different prototypes, I am really happy with the result. A super simple to print and easy to assemble 3D printed LED pendant light.
Here you will find the instructions and the link to download the 3D print models. Simply print out the parts, get the few purchased components, and build your LED pendant light yourself. You can use it perfectly as a pendant light over a kitchen island or directly as a dining table lamp. And the next time one of your guests asks what a 3D printer is even good for, you just need to point to your chic 3D printed pendant lamp.
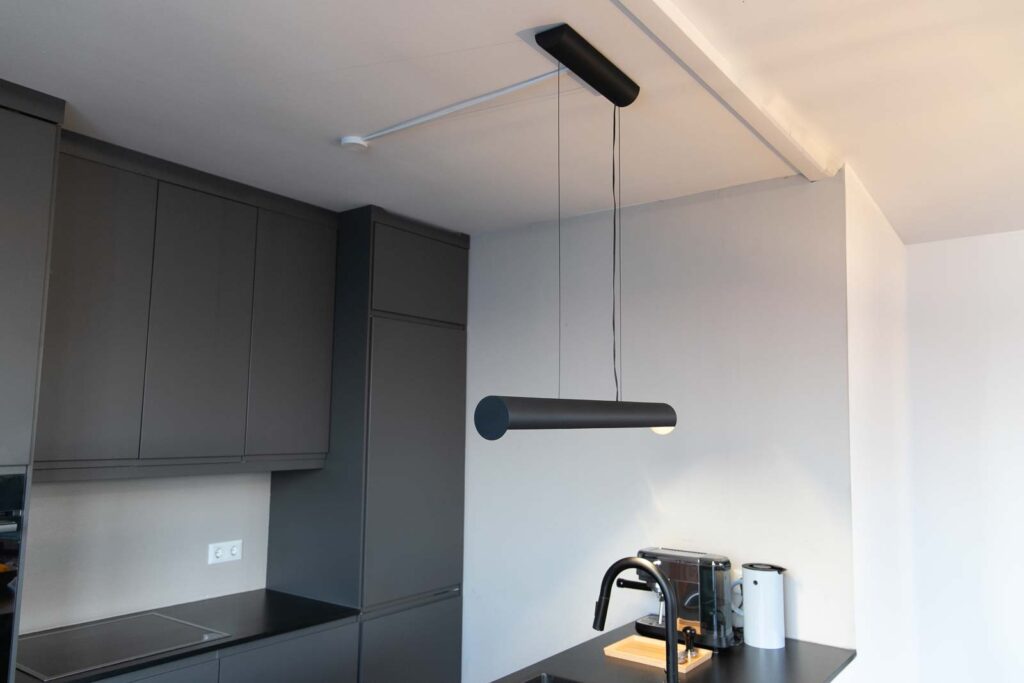
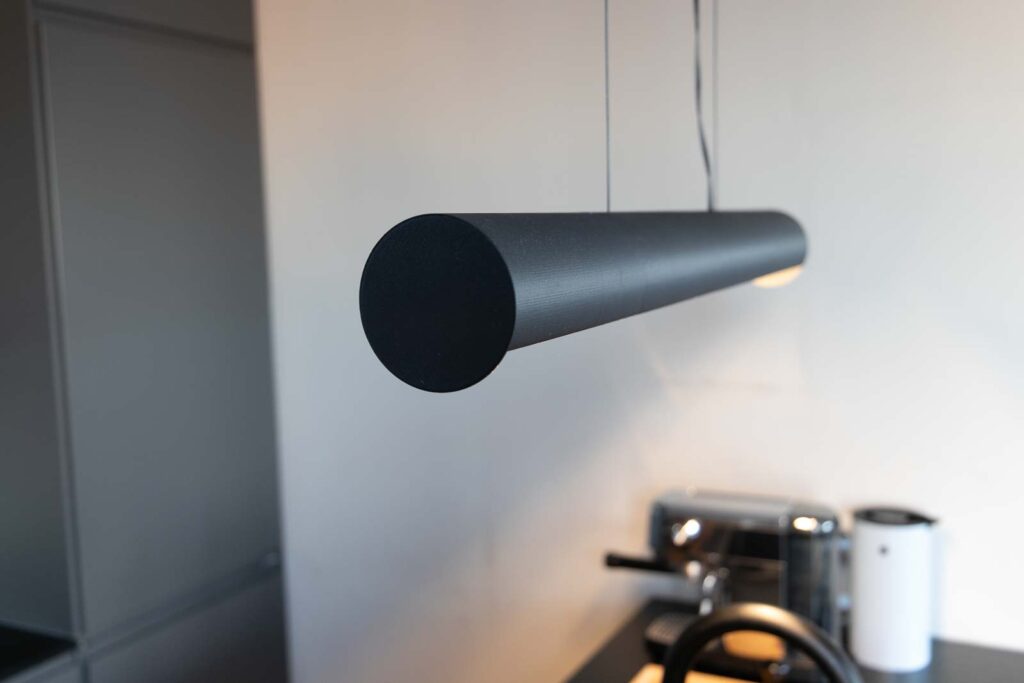
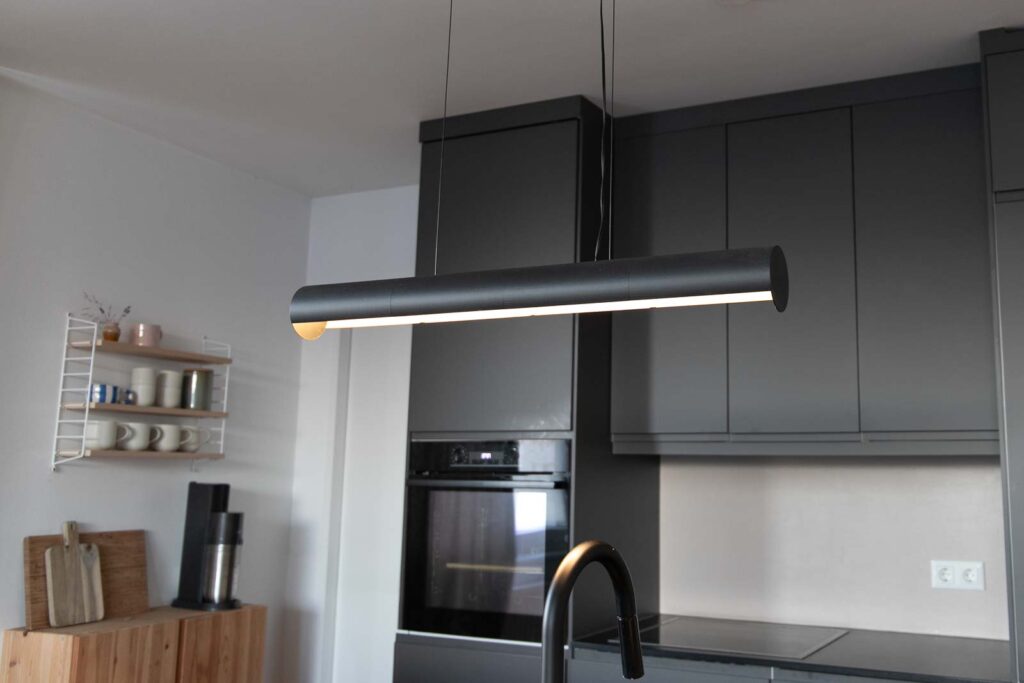
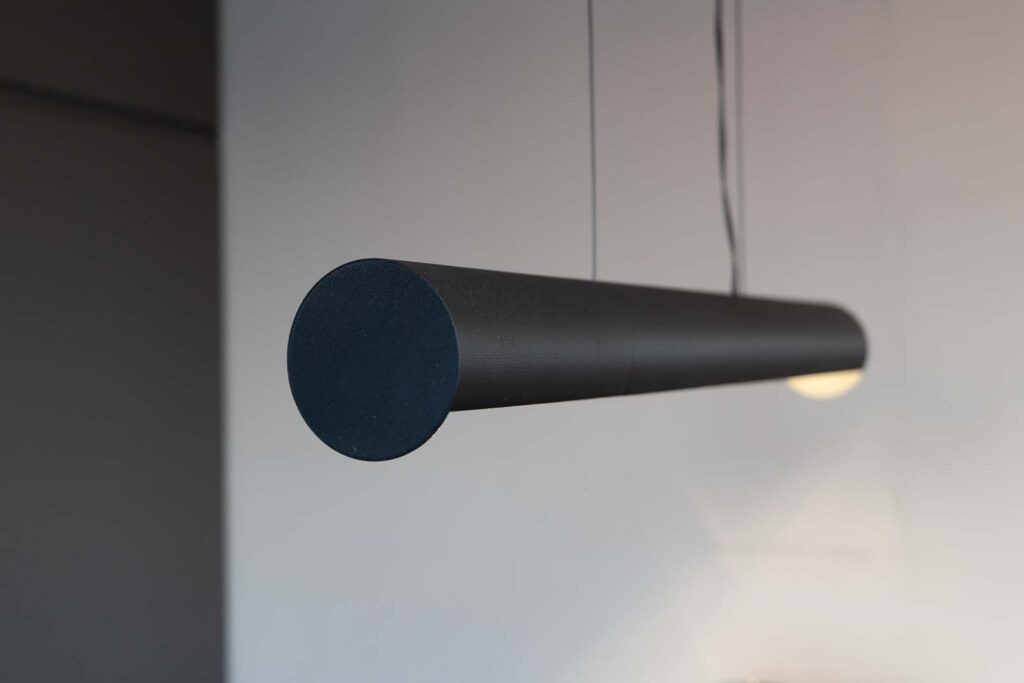
The 3D printed lamp is 80 cm long and has a diameter of 9 cm. The suspension cables of the pendant lamp are, in my case, simply black filament, but you are welcome to use a cord or a thin steel cable. The distance of the light to the ceiling can be continuously adjusted in all cases.
The article contains affiliate links / advertising links, these are marked with an asterisk (*). If you make a purchase through these links, I may receive a commission at no additional cost to you.
3D printed parts
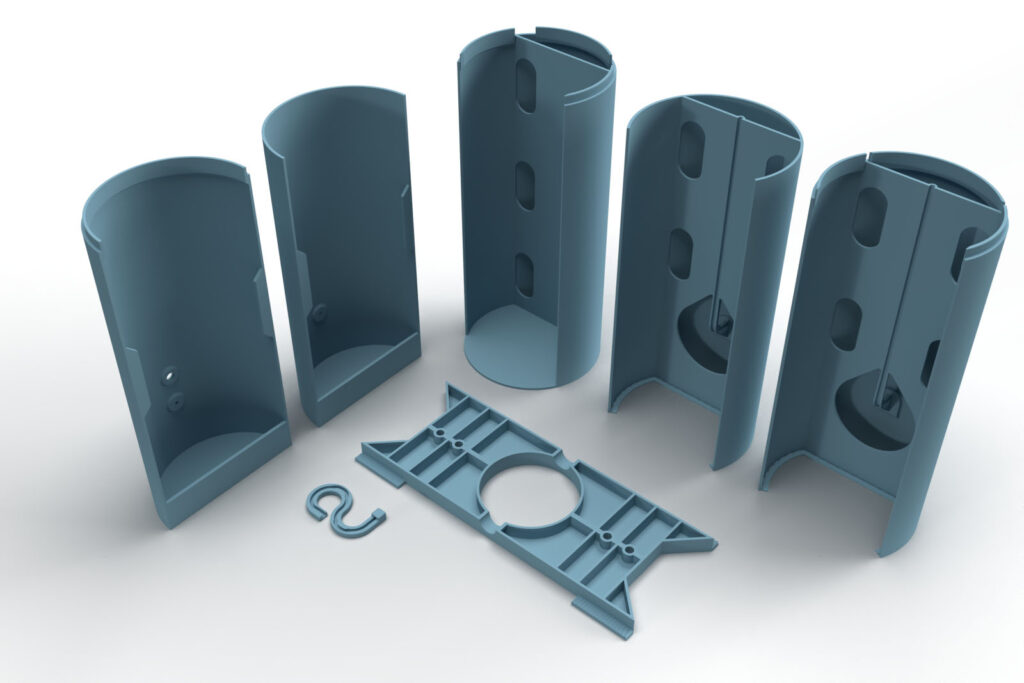
These are purely digital products, you get all the files you need to print the parts yourself in a ZIP folder. It contains the STL files for all required components and variants, as well as additional accessories.
- 013700_Inner_Part_1
- 013800_Inner_Part_2
- 013900_Outer_Part
- 014000_Ceiling_Panel_Part_1
- 014100_Ceiling_Panel_Part_2
- 014200_Ceiling_Mount
- 014300_Filament_Fixture
The largest 3D printed part of this project (014200_Ceiling_Mount) requires a base area (X, Y) of 200 x 85 mm, the tallest part (013900_Outer_Part) is 205 mm high (Z). Thus, any 3D printer with a build volume (X, Y, Z) of at least 200 x 200 x 205 mm is suitable for this project.
3D print settings
All components:
- Layer height 0.2 mm and 30% infill (rectangular)
The components were printed with 3DJake Matt Black PLA Filament with the following settings:
- Nozzle temperature: 215°C
- Heated bed temperature: 60°C
- Perimeter speed: 100 mm/s (First layer: 20 mm/s)
- External and short perimeter speed: 60 mm/s (First layer: 20 mm/s)
- Infill speed: 200 mm/s (First layer: 20 mm/s)
- Top layer infill speed: 50 mm/s
Unfortunately, this matte black PLA filament from 3D Jake is no longer available, but matte black filaments can also be purchased from many other suppliers.
Used 3D printing filament and 3D printer
For the 3D printed lamp in this guide, 3DJake Matt Black PLA Filament was used on a Prusa i3 MK3s with a standard 0.4 mm nozzle.
Caution: Since the wall thickness of the lamp is not very thick and the LEDs will shine inside, components 3D printed with light colors will be translucent, and the inside of the printed components will be visible. This will look a bit like 3D printed lithophanes. Maybe you like it that way, I chose stylish black filament, here everything is covered and nothing shines through.
With the selected settings, approx. 670 g of PLA filament will be used for the 3D printed parts of the LED pendant lamp. At a price of 24.99 EUR per kilogram, this amounts to 17 EUR in material costs for a 3D printed pendant lamp.
The total printing time for all necessary components on the Prusa MK3s is approx. 30 h. With a new Bambulab X1C printer, only 12 h of printing time is needed in total. To calculate the total printing time, all printing times are added up, with the entire quantity of a component always being printed at once.
Due to its higher strength, I recommend a piece of PETG filament as material for the wires. For the 3D printed lamp here, a black PETG filament from Prusament* was used. PLA is explicitly not recommended because its lower strength and more brittle nature can easily cause it to break or tear.
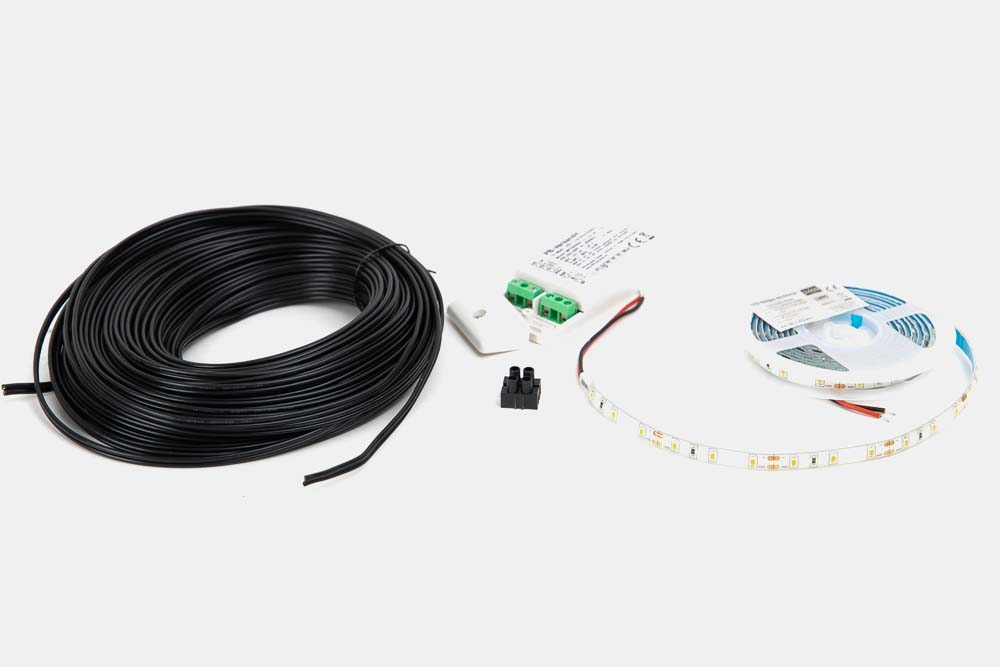
Bill of materials: Needed purchased parts for the 3D print pendant lamp
In addition, only a few purchased parts are needed for the self-built LED pendant lamp.
- Flexible LED strip 2 meter (6.56 ft) 12V 24 Watt* (10 EUR / pc)
- LED driver transformer 12V DC 30 Watt* (13 EUR / pc) – or suitable for the selected LED power
- Luster terminal block connector set (0.25 EUR / pc)* – or suitable for the selected LED power
- Black cable 2x 0.75 mm² (25 m)* (0.36 EUR / m) – or suitable for the selected LED power
- Black zip ties 250×3.6mm* (0.04 EUR / pc)
In addition to the electronic components, two dowels and screws are needed to screw the ceiling mount to the ceiling.
The total cost of the purchased parts thus amounts to approx. 24 EUR, without shipping costs and if only the costs for the required parts for one pendant lamp are added up.
Required tools
As always, a new project is the best excuse to buy new tools ;), not all are required but some help save some time.
- Superglue*
- Box cutter / Utility knife* or scalpel*
- Side cutters Knipex*
- Screwdriver*
- Automatic wire stripper*
- Crimping tool and ferrule set*
- Wall scanner: locating device for pipes and electric cables*
Side cutters and wire strippers are not absolutely necessary, but should not be missing in any good maker’s equipment anyway.
Instructions: Assemble 3D printed LED pendant lamp
The 3D printed lamp is assembled from several parts, each about 200 mm high – four parts together then result in the length of the pendant lamp of 800 mm. After printing, printing aids are needed to cut off. This makes printing possible even without brims. After the parts have been glued together, only the installation of the LED light sources remains, followed by fastening to the ceiling.
Following are the step-by-step instructions for building the 3D printed LED yourself. As always, safety first, please read and observe the safety instructions for assembly.
Safety Guidelines
Safety first! Read and observe the assembly instructions!
Read the entire assembly instructions carefully and adhere to the instructions and safety warnings. If anything is unclear, simply contact support (support@3d-druck-vorlagen.de).
These instructions are only intended for persons of legal age (over 18 years old). If you lack knowledge in handling the tools or processes that occur, then it is essential to seek the help of trained persons. The preparation and assembly of the project is at your own risk.
Legend: Warnings and symbols


General safety instructions for assembling the project
Wear assembly gloves to protect your hands during all processing steps in which saws or knives are used.
All work steps involving electrical work (e.g., connecting the LED driver to the mains voltage) may only be carried out by trained specialist personnel.
The electronic components for this project may only be selected by trained specialist personnel. Incorrectly selected electronics (e.g., mismatched LED strips, drivers, and/or cables) can lead to injury or fire.
Only use light sources in the pendant lamp that do not produce strong waste heat. Other light sources, such as conventional incandescent bulbs, could soften, melt, or even cause a fire in the 3D printed lamp body.
3D printing of all components for the DIY pendant lamp
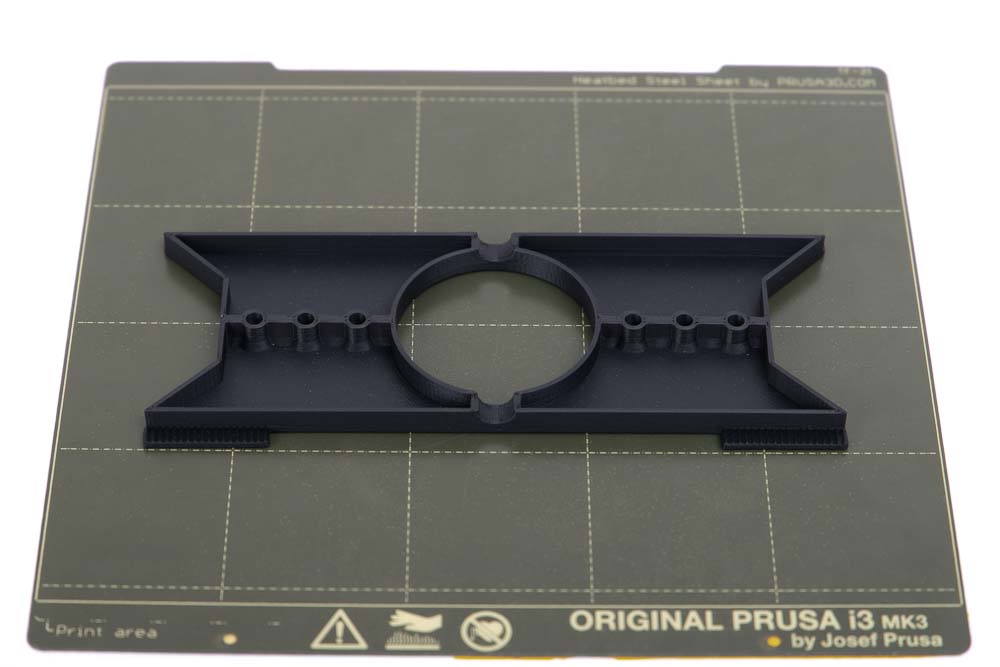
As a first step, simply print out all the necessary 3D printed parts. The individual 3D printed parts are shown below on the build plate of the Prusa i3 MK3S. Of course, as many parts as possible can also be printed at once.
Required 3D printed parts

- 2 pcs 013900_Outer_Part
Layer height 0.2 mm and 15% infill (rectangular), minimum 2 perimeters
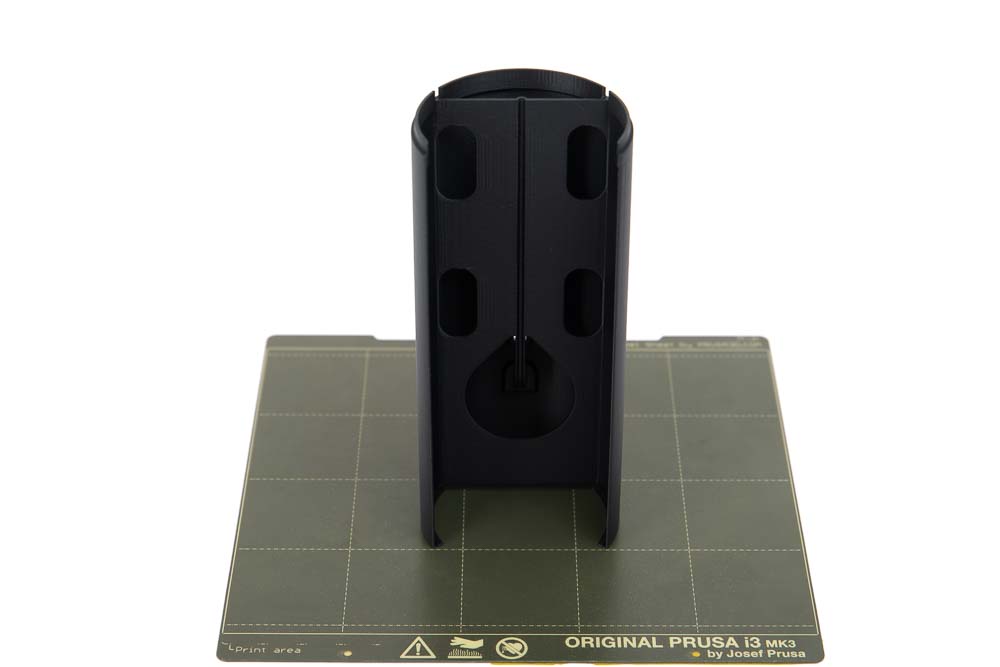
- 1 pc 013700_Inner_Part_1
Layer height 0.2 mm and 15% infill (rectangular), minimum 2 perimeters
- 1 pc 013800_Inner_Part_2
Layer height 0.2 mm and 15% infill (rectangular), minimum 2 perimeters

- 1 pc 014000_Ceiling_Panel_Part_1
Layer height 0.2 mm and 15% infill (rectangular), minimum 2 perimeters
- 1 pc 014100_Ceiling_Panel_Part_2
Layer height 0.2 mm and 15% infill (rectangular), minimum 2 perimeters
- 1 pc 014200_Ceiling_Mount
Layer height 0.2 mm and 15% infill (rectangular), minimum 2 perimeters
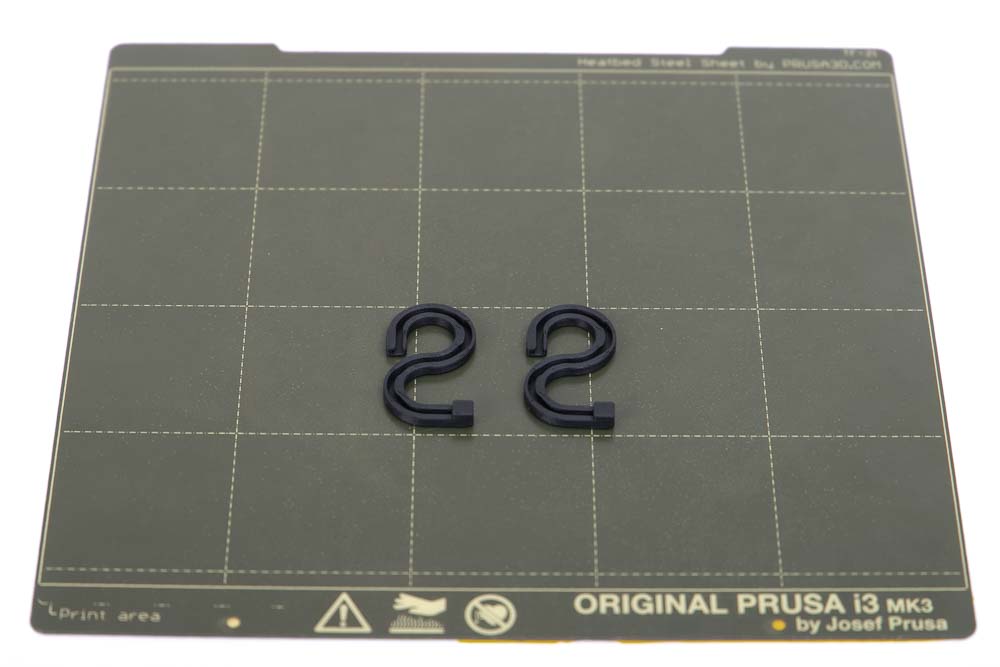
- 1 pc 014300_Filament_Fixture
Layer height 0.2 mm and 15% infill (rectangular), minimum 2 perimeters
Once all 3D printed parts are ready, proceed to the next step.
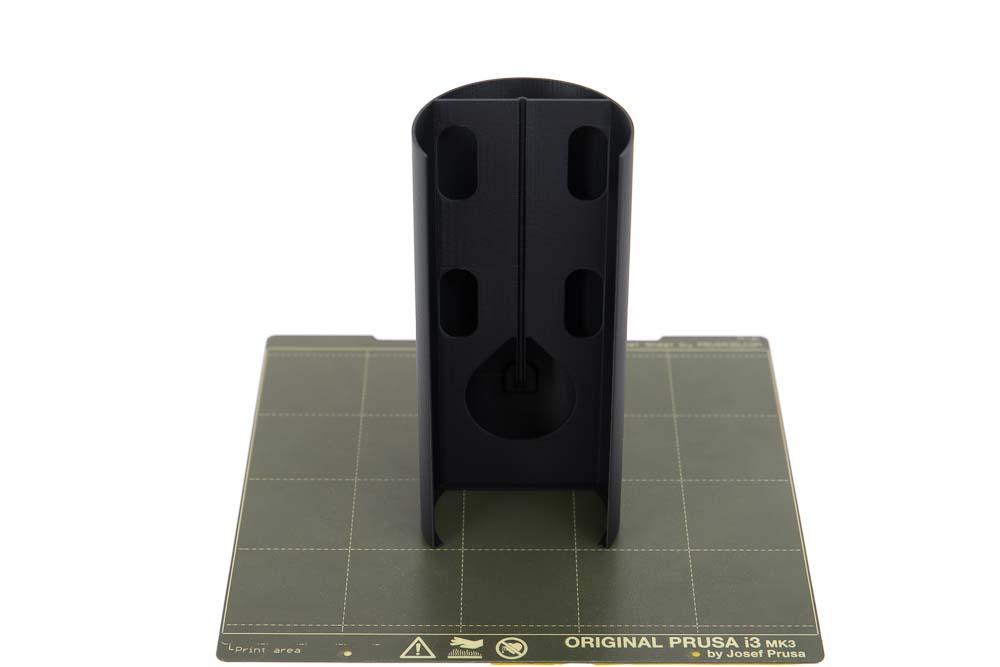
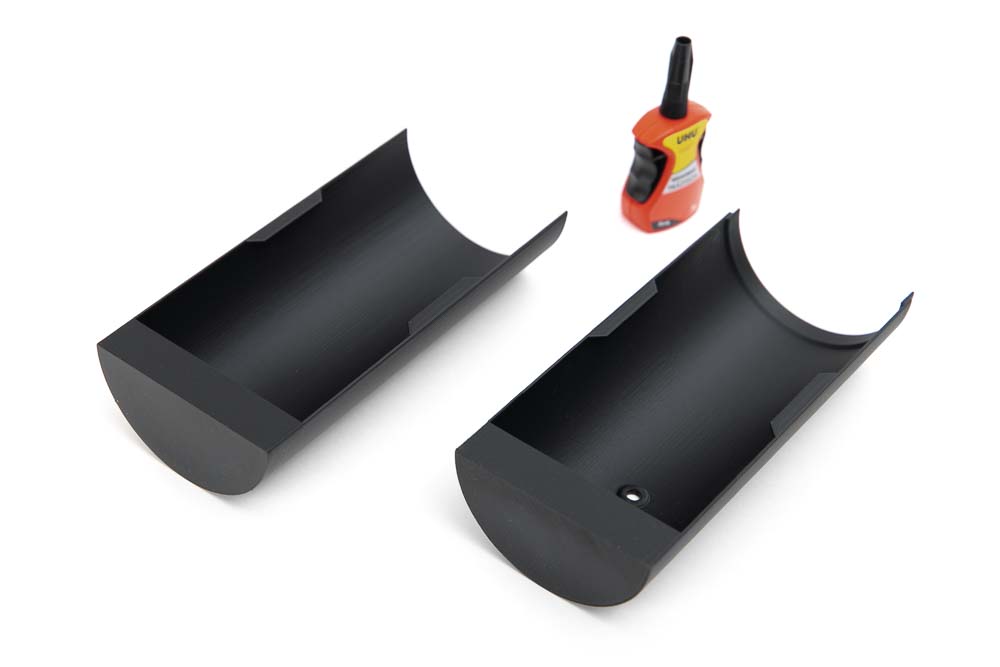
Removing the printing aids
Since the inner parts of the 3D printed LED lamp have very narrow contact surfaces where they are connected to the print plate, printing aids have been modeled directly with these parts. These increase the adhesion of the parts during 3D printing and thus prevent detachment from the print plate during the 3D printing process.
Since the support aid is only attached to the inside, it does not lead to an unsightly burr on the visible outer edges of the pendant lamp, as would be the case when using a brim. However, the printing aids are in the way when gluing the individual parts and must now be removed.
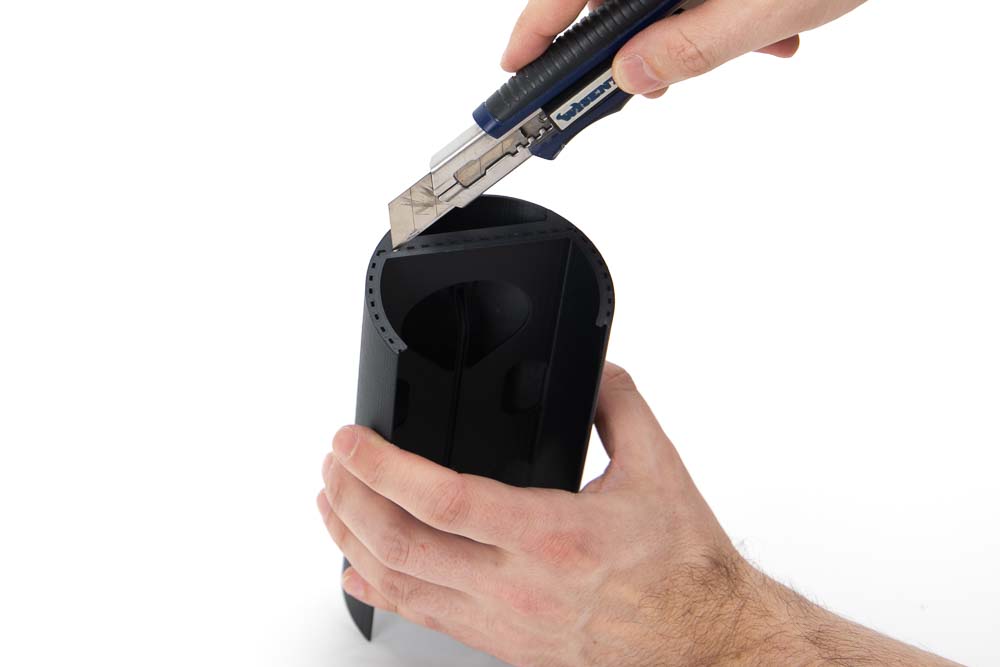
To separate the printing aids, simply cut along the small recesses on the inner edges with a utility knife or scalpel.
Caution, risk of injury! Be careful of cuts when removing the printing aids. Wear assembly gloves to protect your hands.

Separate the printing aids on the cylindrical, curved areas as close as possible to the inner wall of the lamp. The adhesive tabs of the other parts will later lie here. The straight piece in the middle has no function and will not be visible later, so it is not so bad if the cut edge is not perfectly clean and neat.
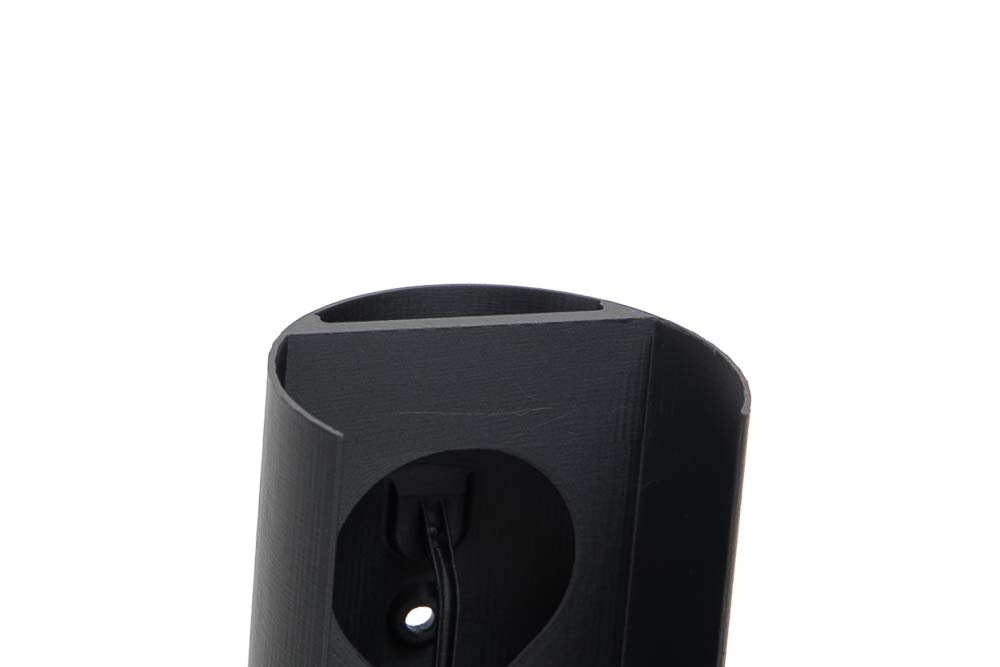
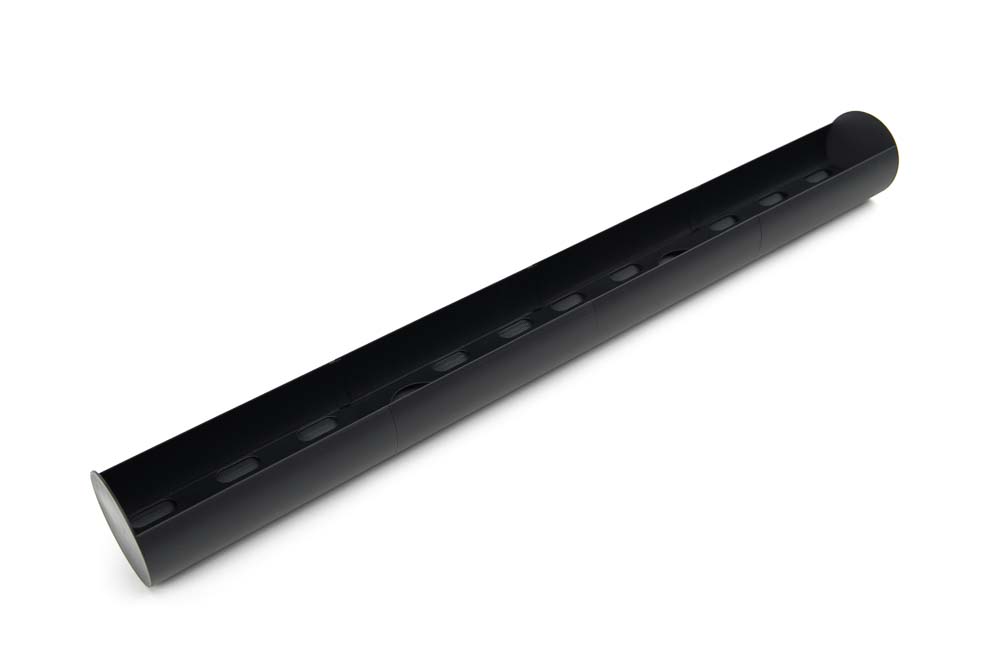
The finished ends of the 3d printed inner parts should now look like this.
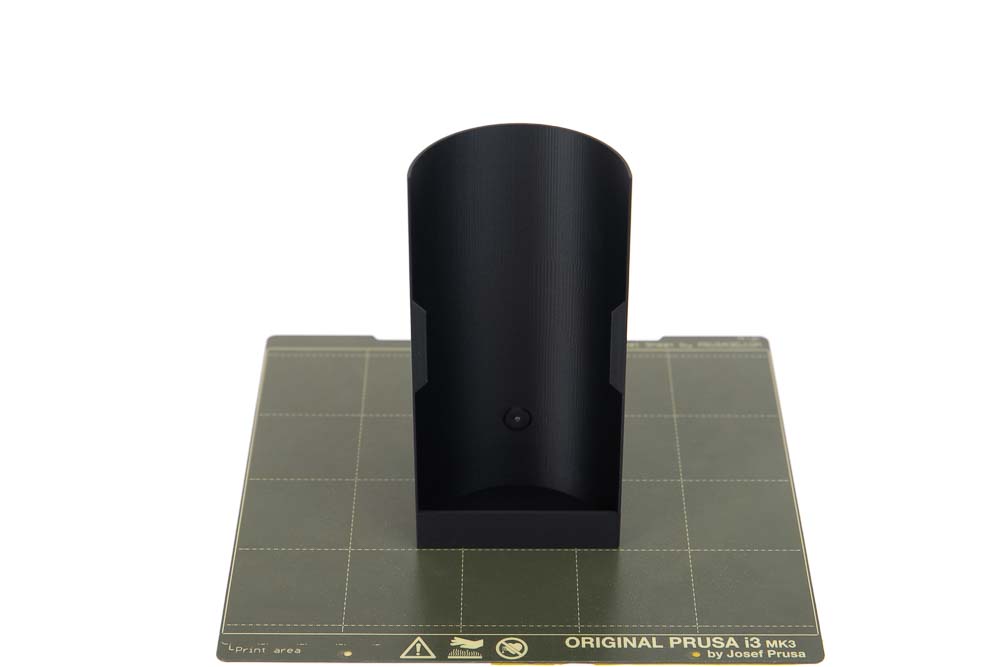
Gluing the individual parts to form the LED pendant lamp
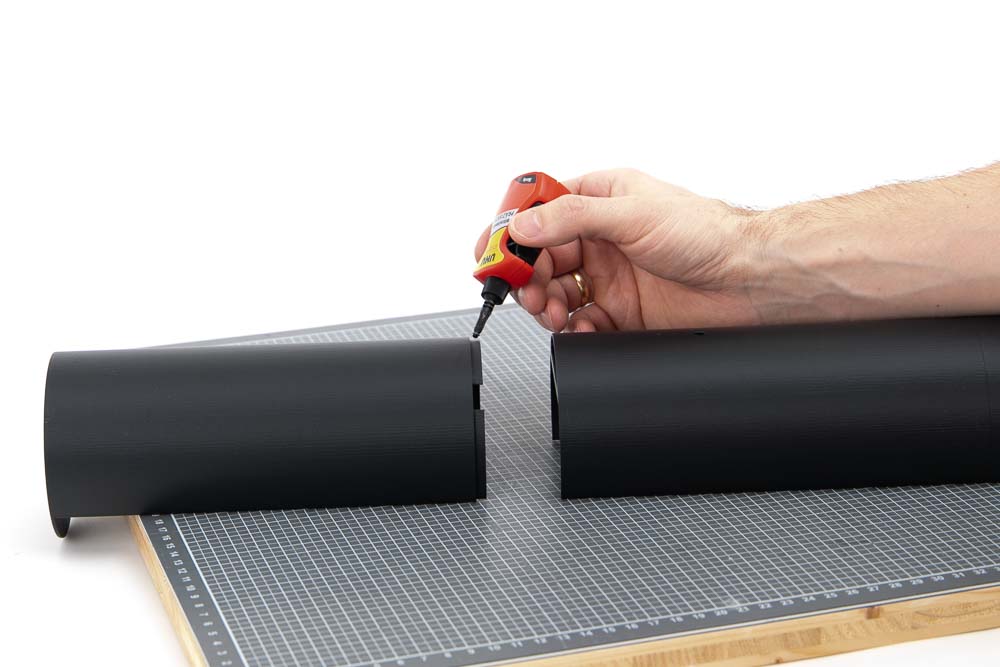
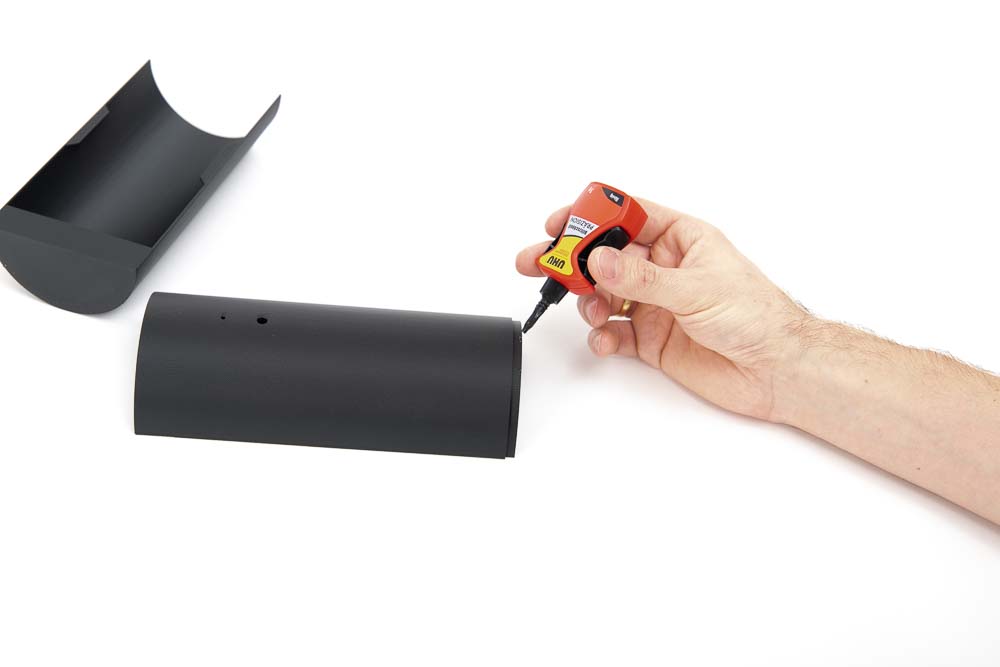
After all parts have been prepared, they are glued in this step. This is done very simply with superglue, which is applied to the existing adhesive tabs.

Only superglue is needed, and if available, a straight board as a base, or simply a table that is as straight as possible on which the parts can be aligned during gluing. Apply as little superglue as possible to the adhesive tabs.

Only thinly coat the adhesive tabs with superglue! This is important to avoid unsightly glue residue on the outside of the cylindrical lamp body.

After coating, align and join the parts and press briefly until the glue has dried.
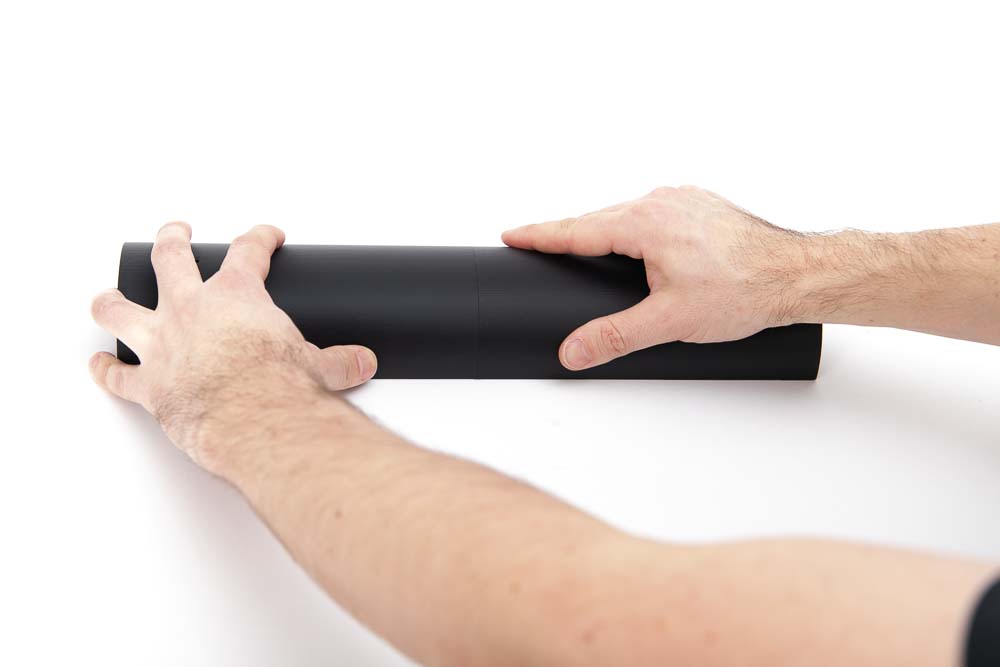
Since the 3D printed outer parts have a downward-protruding part, simply place these parts over the edge of the table or use a board as a base. Again, coat the tabs with glue.
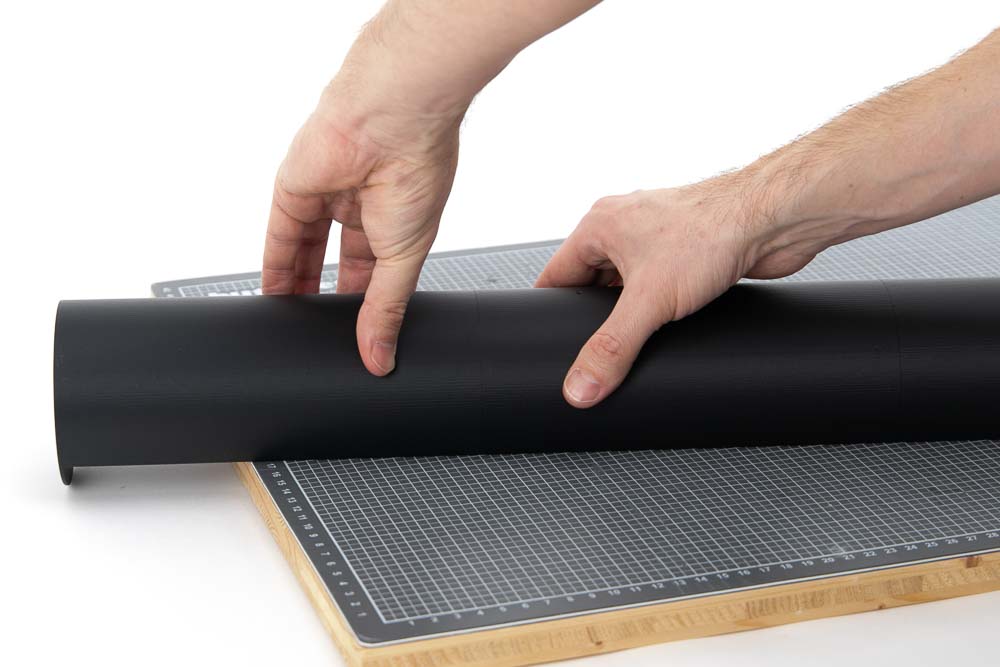
Press and hold again until the superglue has hardened a little.

Now do the same with the second outer part – place the parts so that the downward-protruding edge pieces extend over the edges of the base board or the table used. Then again, coat the adhesive tabs with superglue.
Press parts together and let them harden.
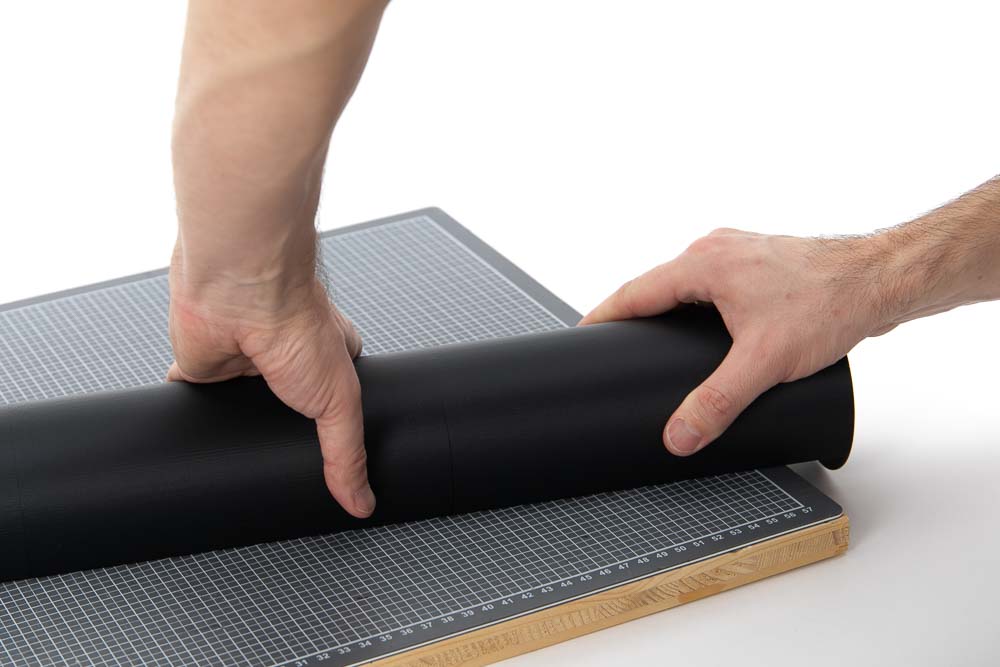
Congratulations! The light housing of your 3D printed pendant lamp is finished and should now look like this.
Gluing the individual parts for the ceiling panel
After the light tube, the parts of the ceiling panel are now glued. This is done exactly as before with the light cylinder.
Only superglue and the two 3D printed ceiling panel parts are needed.
Thinly coat the adhesive tab on one part of the ceiling panel with superglue.
Press parts together and wait briefly until the glue has dried.

The finished ceiling cover now looks like this.
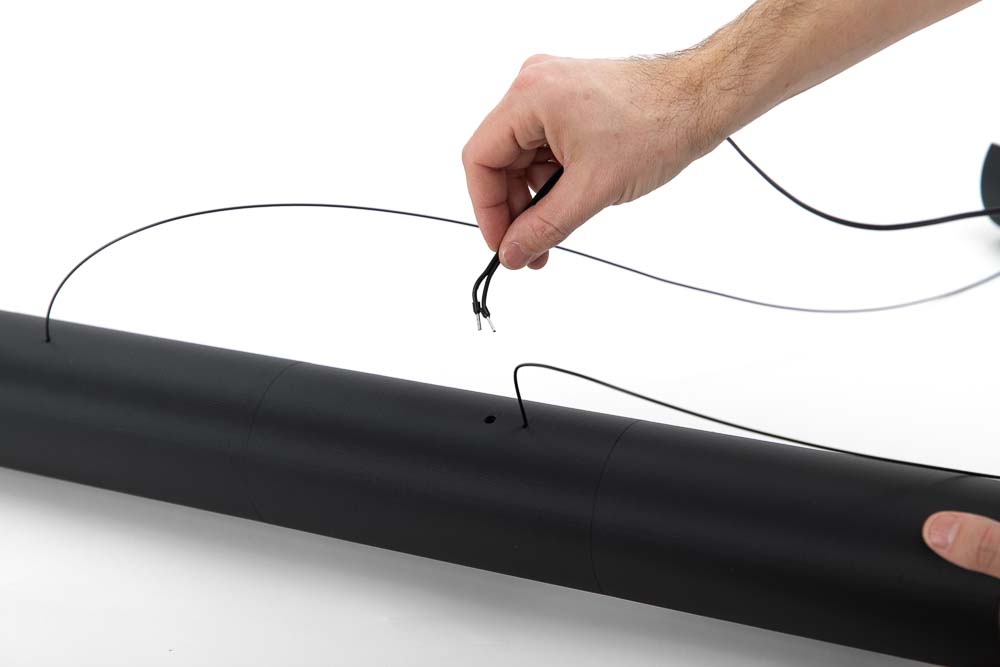
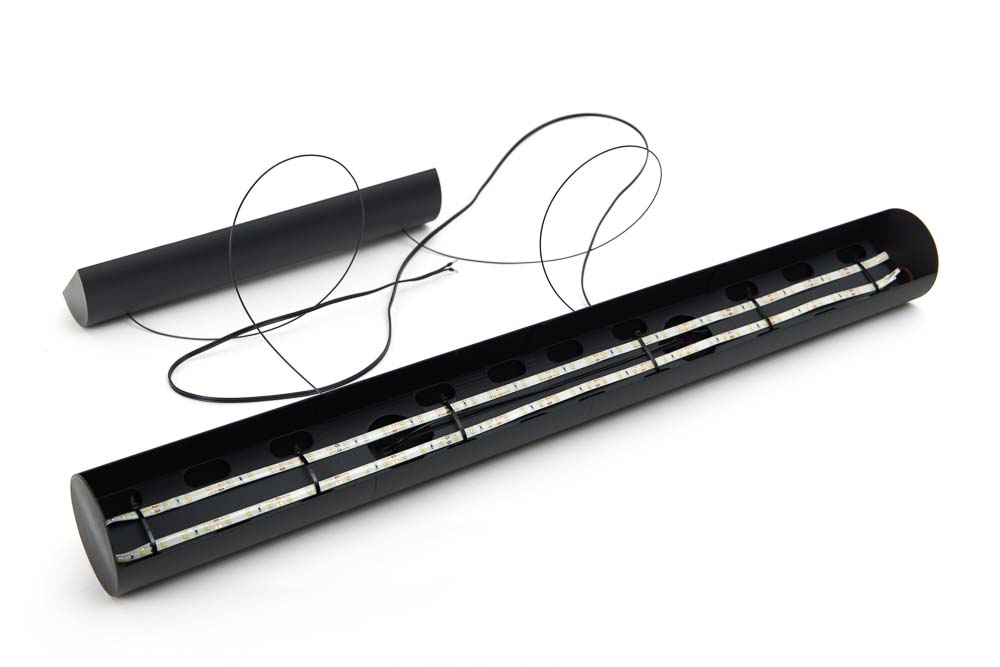
Attaching the suspension cords of the 3D printed lamp
Now the suspension cords are mounted to prepare the pendant lamp for the electronics.

The already glued parts, as well as filament and the 3D printed filament fixations, are needed. Of course, other cords or ropes can also be used, I chose filament because I really have too much of it lying around 😉
Do not use PLA filament here, it is too brittle for hanging and not tear-resistant enough – PETG, ABS, or ASA are better suited for this.
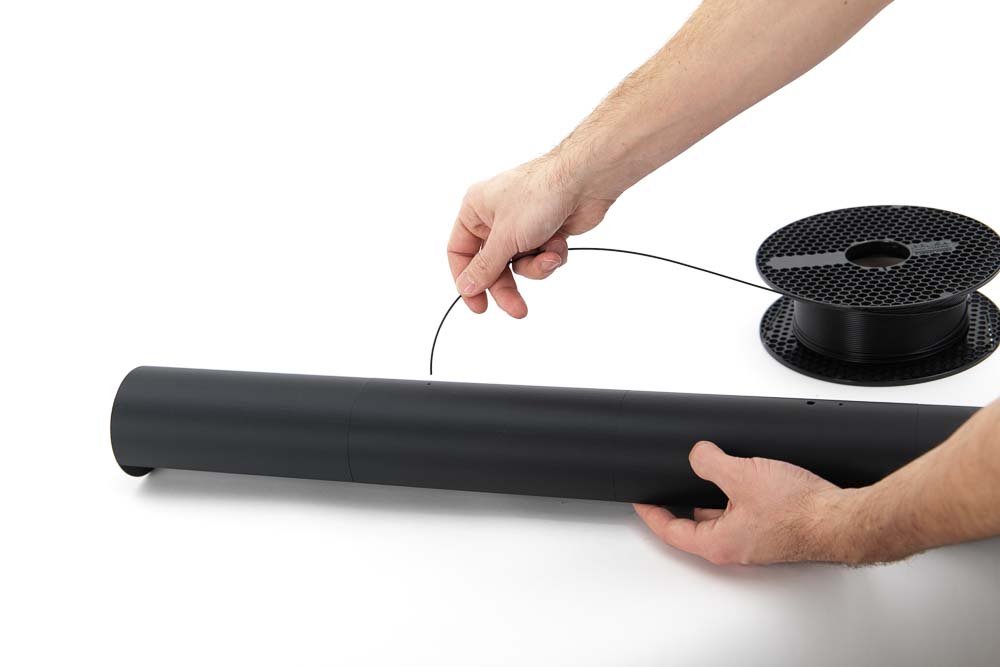
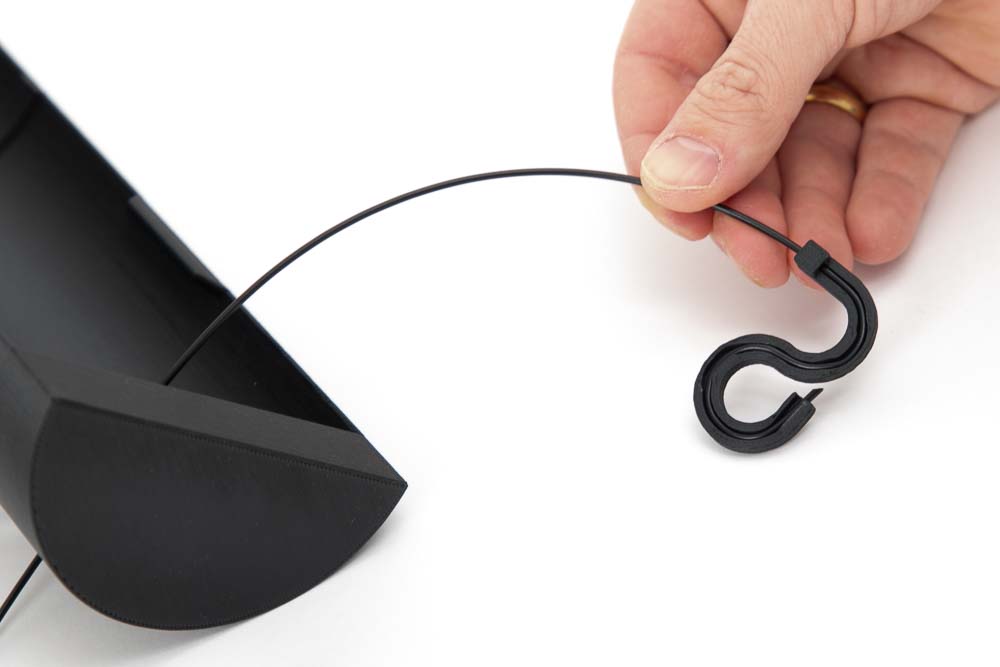
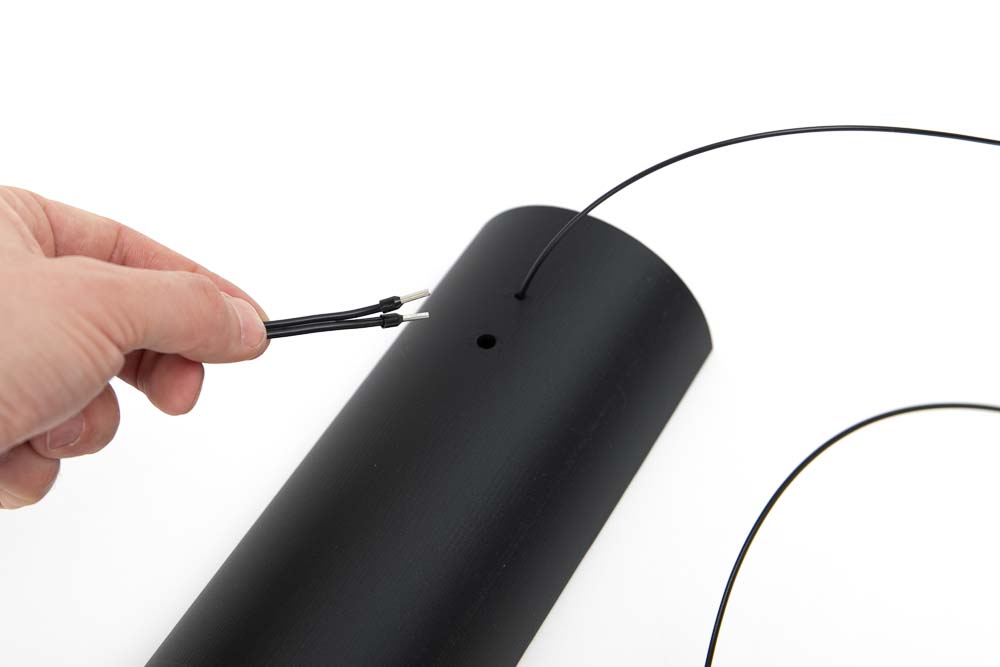
Thread the filament, cord, or rope through the small holes in the light tube.
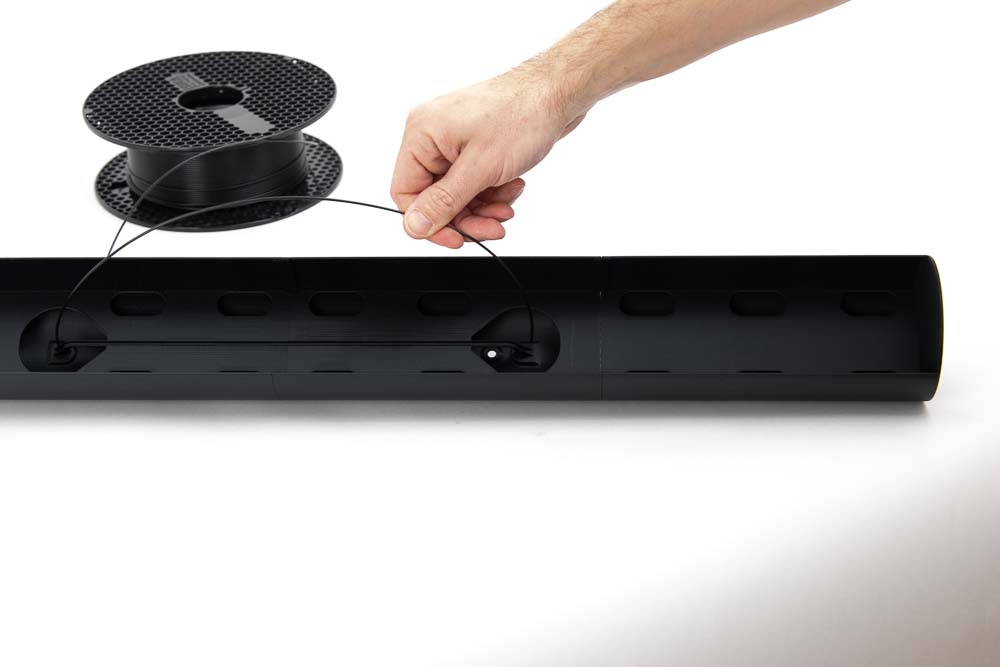
Guide it inside to the second small hole and thread it back out there.
Perfect, the filament or rope is redirected inside, which later simplifies the lamp’s setup.
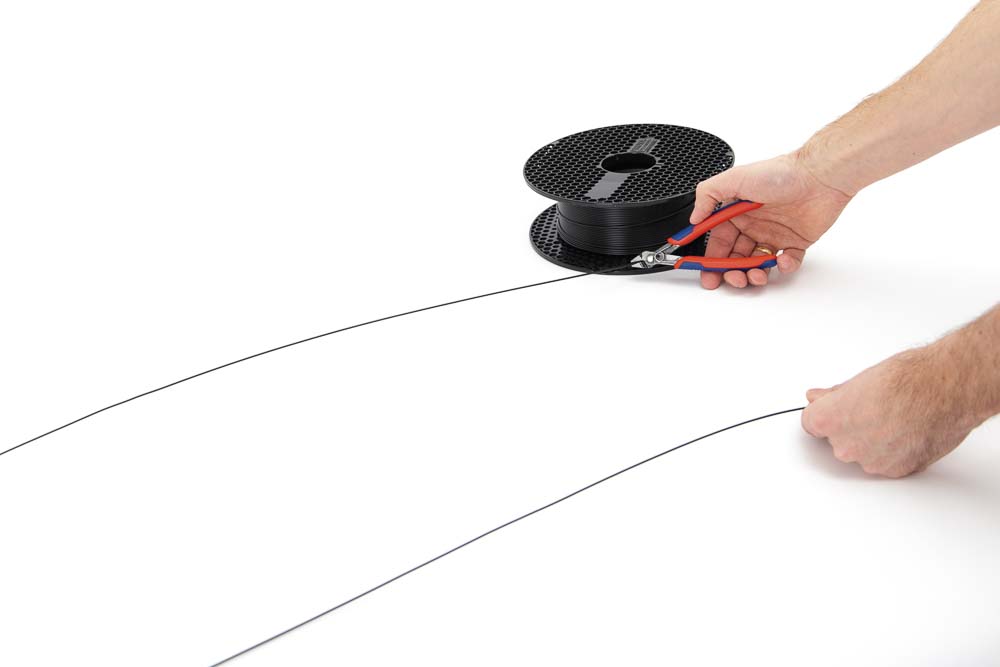
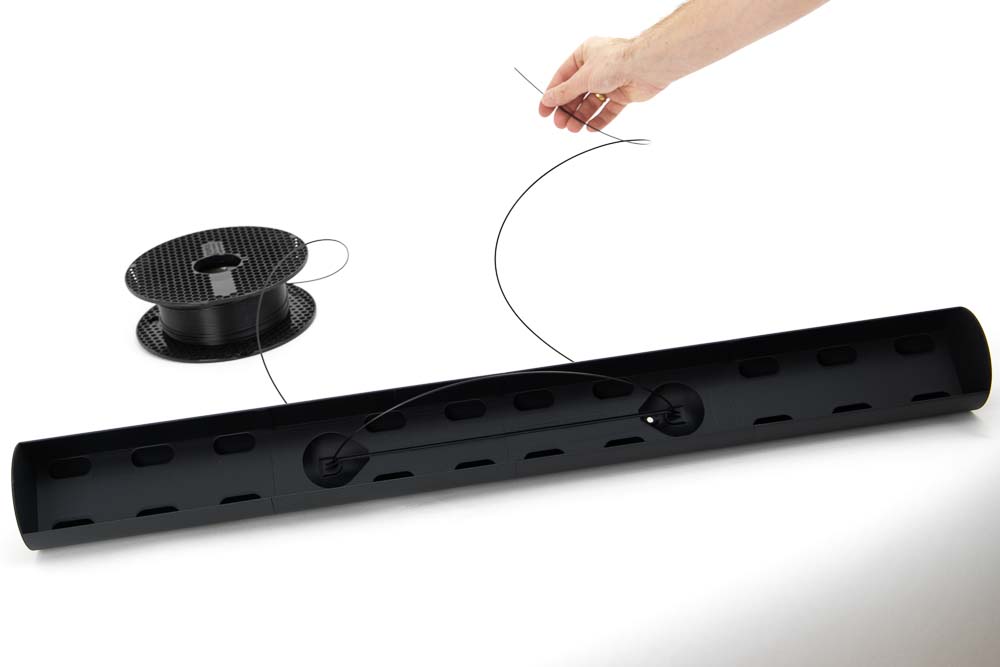
Adjust the desired length and then snip the filament or cord.
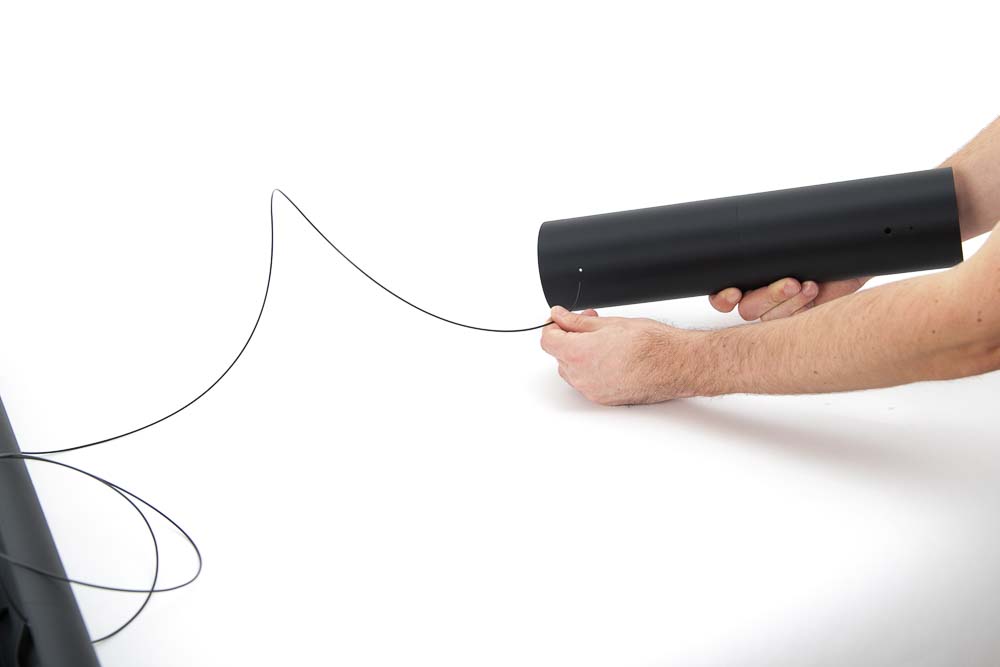
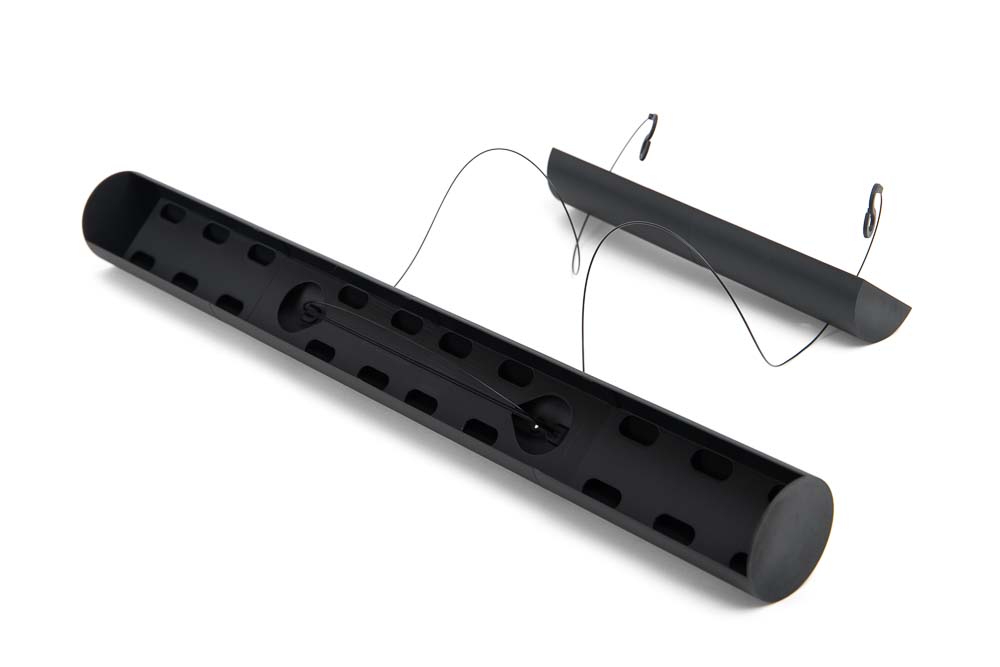
Thread it into the ceiling panel, again into the small holes provided for this purpose. Align it so that the large holes (for the power cable) are on top of each other.

3D printed Lamp with installed suspension ropes.
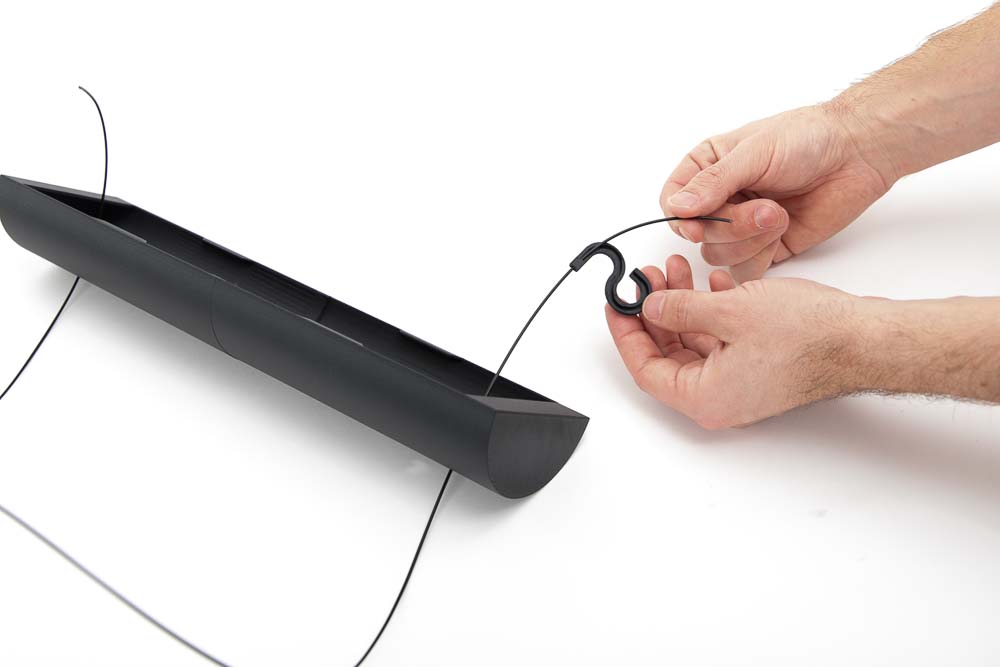
If filament is used for suspension, then pull the filament fixture onto the filament. First, thread the filament through the small hole on the fixing device.
If using cords or thin ropes, simply tie them to the filament fixer.
Then press the filament into the predetermined serpentine shape. Due to the deflection, the friction is so great that the filament no longer slips.
Attach the fixers to both filament ends, or tie knots if using cords.
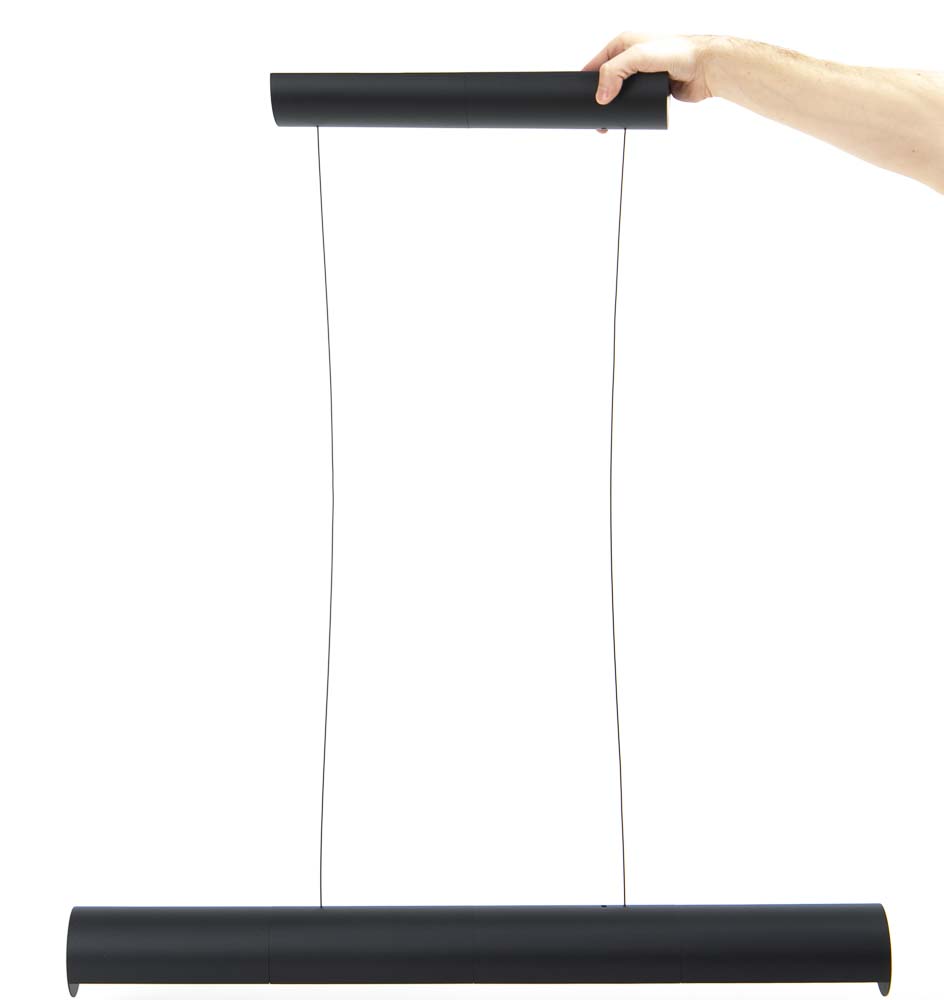
The finished pendant light should now hang nicely on the ceiling panel. Great, now all that’s missing is the LED strip and electronics.
Installation of LED strips and electronics
In the penultimate step, the flexible LED strip is installed and the LED driver is connected. After that, the 3D printed LED pendant lamp is ready for assembly.
All work steps involving electrical work must only be carried out by trained specialists.
The purchased parts, which are already linked further up in the step-by-step guide, are required. In addition to the flexible LED strip, cable zip ties, a luster terminal, LED driver, and a cable are needed.
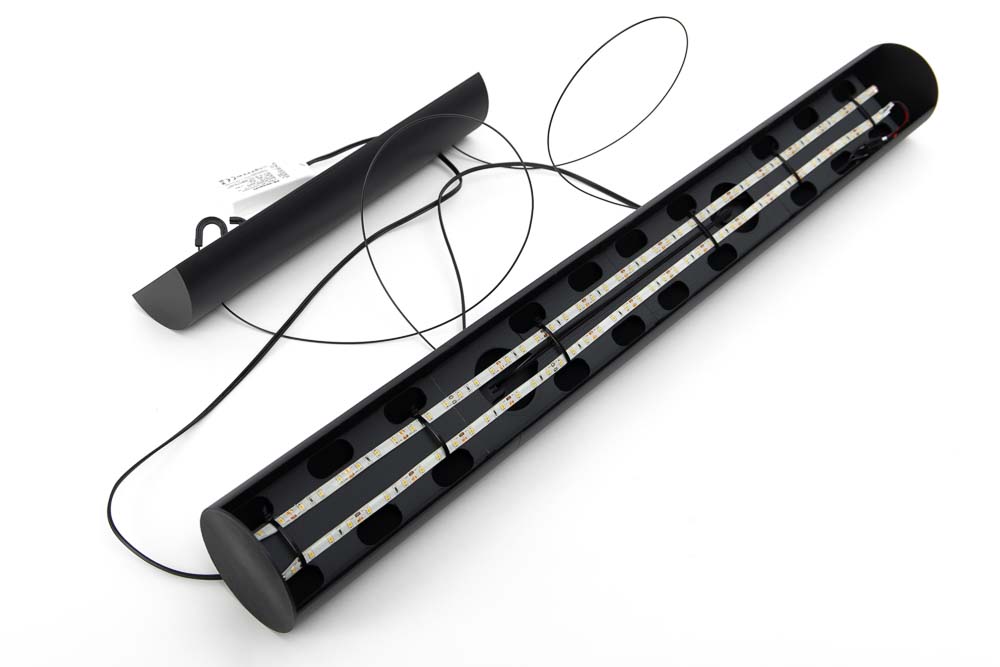
Strip the cable ends and fit them with wire ferrules. Then insert them through the designated hole in the light tube.

Connecting the flexible LED strip using luster terminals.

The LED strip is fastened in the lamp body using zip ties. Simply thread them through the designated openings and fix two strips of the LED strip parallel to each other.
Here it is particularly important that the small LED lights on the strip are mounted so that they point away from the mounting surface in the lamp body and towards the opening of the lamp.

Simply snip off excess zip ties.
Place a zip tie approximately every 15 cm to secure the LED strip. Remove any protruding zip ties. The 3D printed pendant lamp should then look like on the photo.
Snip the cable a little longer than the ropes. The extra length can simply be accommodated in the ceiling panel. Strip the cable ends and fit them with wire ferrules, then feed them through the larger hole in the ceiling panel.
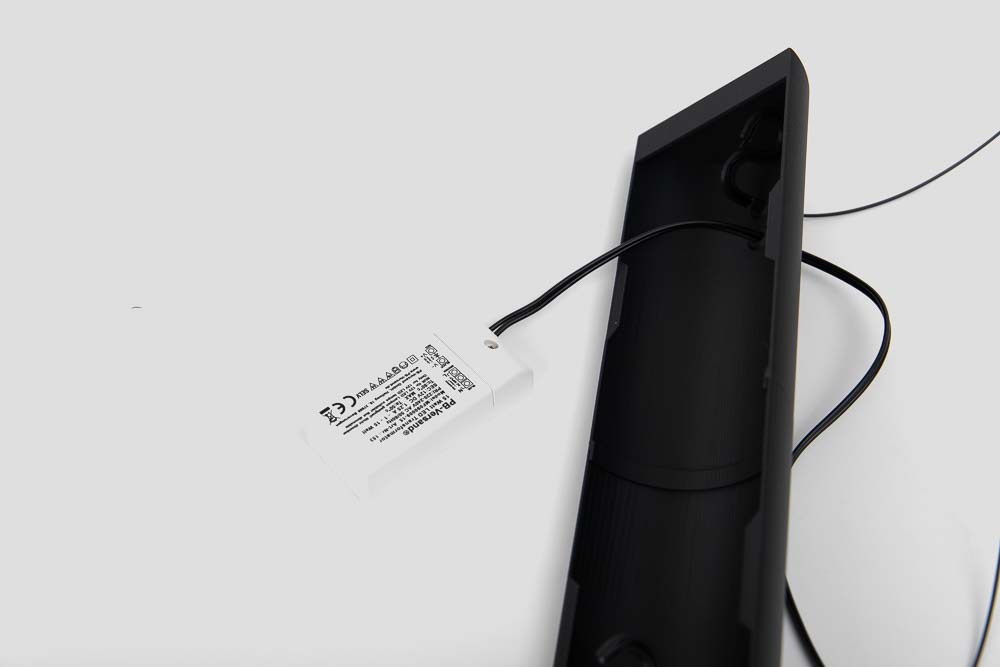
Connect the cable to the 12V DC output of the LED driver or transformer. Pay attention to the correct polarity! Plus to plus, minus to minus.
Very good! The 3D printed pendant lamp is now ready for assembly.
Mounting the pendant lamp on the ceiling and connecting it to the power supply
In the last step, the DIY pendant lamp is mounted on the ceiling and connected to the power. Please be careful and only let trained specialists carry out the electrical work.
All work steps involving electrical work must only be carried out by trained specialists. All power connections must be de-energized and secured against re-energization!

For the last step, the fully assembled pendant lamp and the 3D printed ceiling mount are required. This is simply screwed to the ceiling, and then the pendant lamp can be easily hung on it.
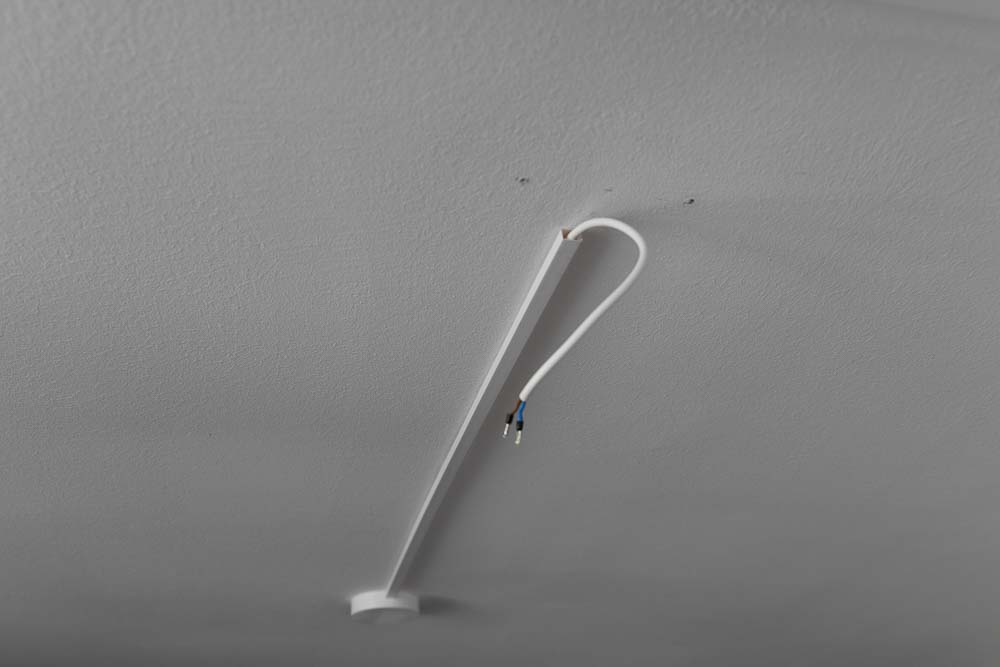
The ceiling mount can either be mounted directly above a lamp junction box, or the lamp connection can also be routed from the side, as shown here in the picture.
For this, I simply connected an extension cable to the junction box. The cable can then simply be routed beautifully along the ceiling using a cover.
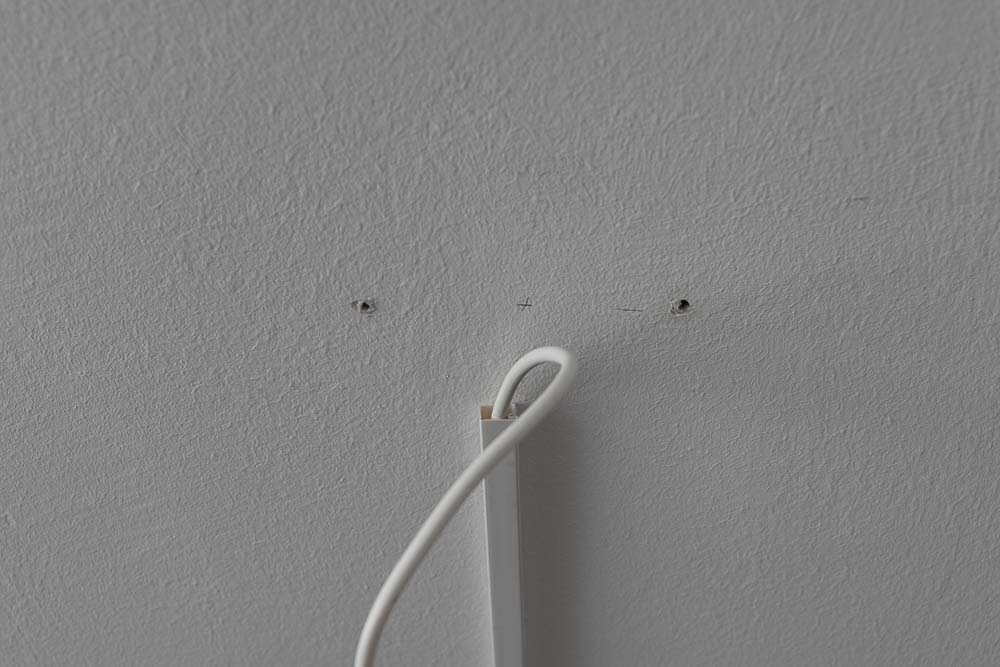
Drill two holes in the ceiling at a distance of 110 mm (for the inner drillings of the ceiling mount). The 3D printed ceiling mount also has two holes at a distance of 140 mm, in case something is in the way of the inner drillings or it is not possible to drill there.
To ensure that no lines or pipes in the ceiling are drilled into, I recommend a locating device like this wall scanner: locating device for pipes and electric cables*. It has saved my butt many times 😉
Insert the dowels suitable for the ceiling and prepare suitable screws.
Attention! Make sure that no pipes or electrical lines run at the drilling points in the ceiling.

Fasten the ceiling mount to the ceiling with the appropriate screws. The smooth surface must face away from the ceiling, the ribbed part of the mount faces the ceiling. Connection cables coming from the side should be routed through the appropriate opening on the side, as shown in the picture.
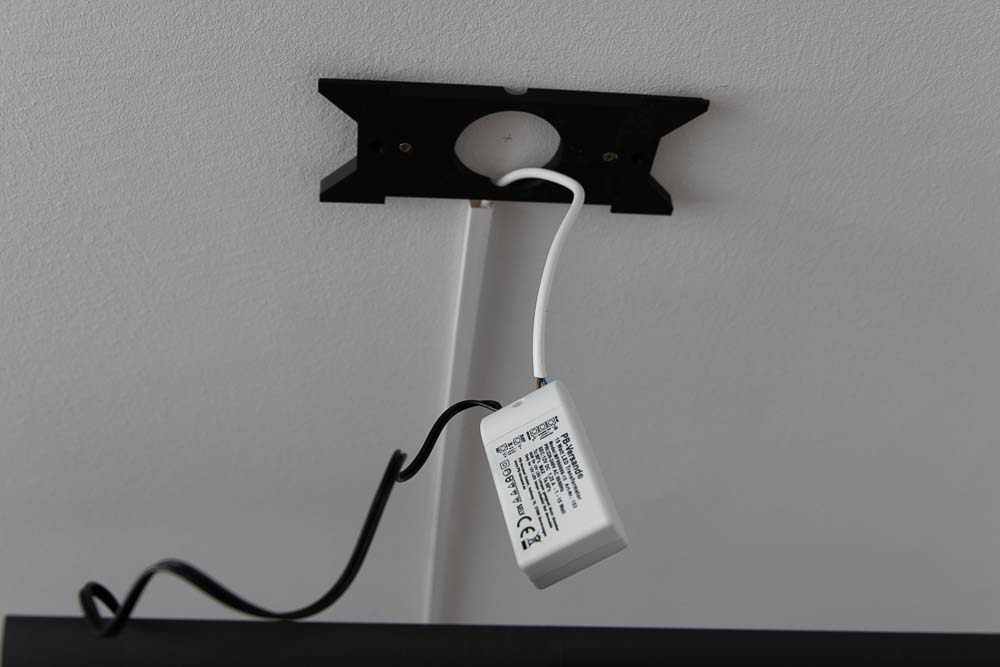
Connect the LED driver or transformer to the mains voltage supply.
Caution, there is a risk of life here, only carry out with secured de-energized lines and only by trained specialists.
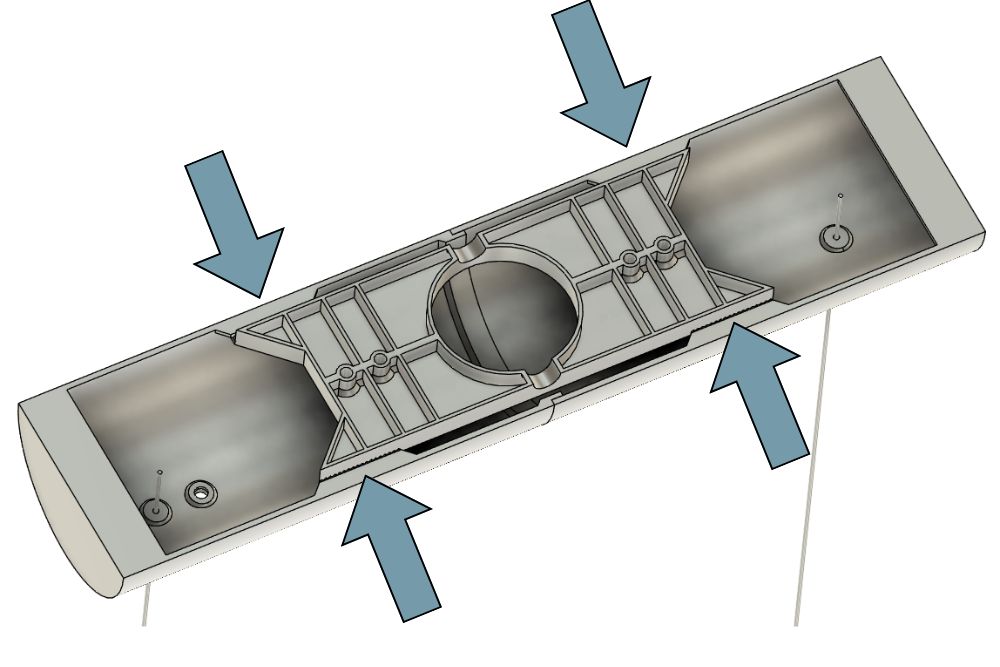
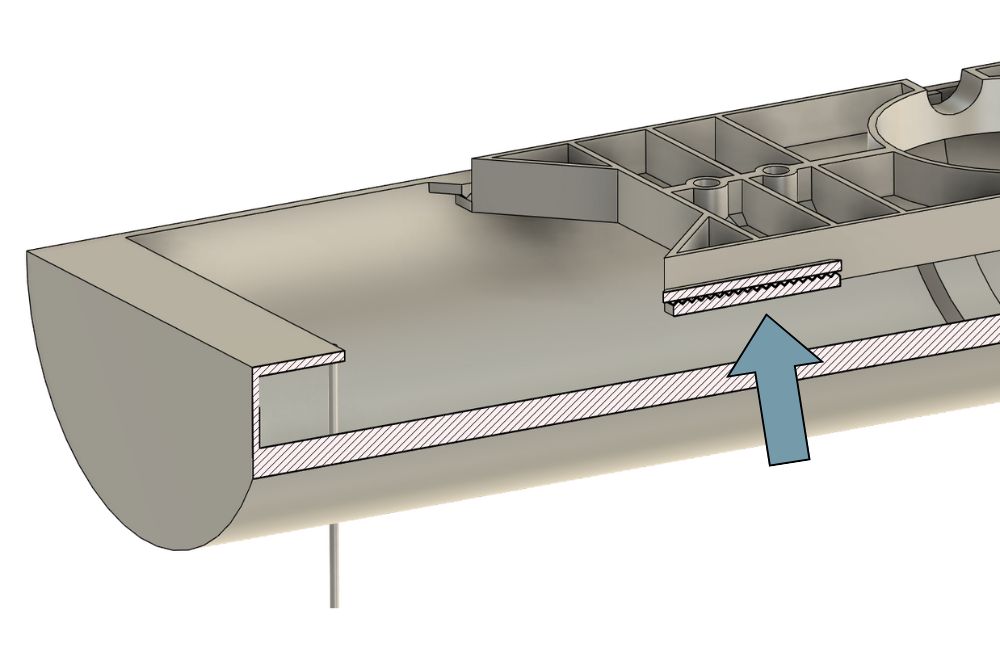
The holding mechanism for the ceiling trim works very simply. On the ceiling mount there are 4 protruding retaining claws with many small teeth on them. In the ceiling panel, the corresponding counterparts are housed.
The ceiling panel is then simply placed about 5 cm off-center on the ceiling mount and pushed towards the center. This causes the retaining claws to overlap, the teeth interlock, and prevent slipping.
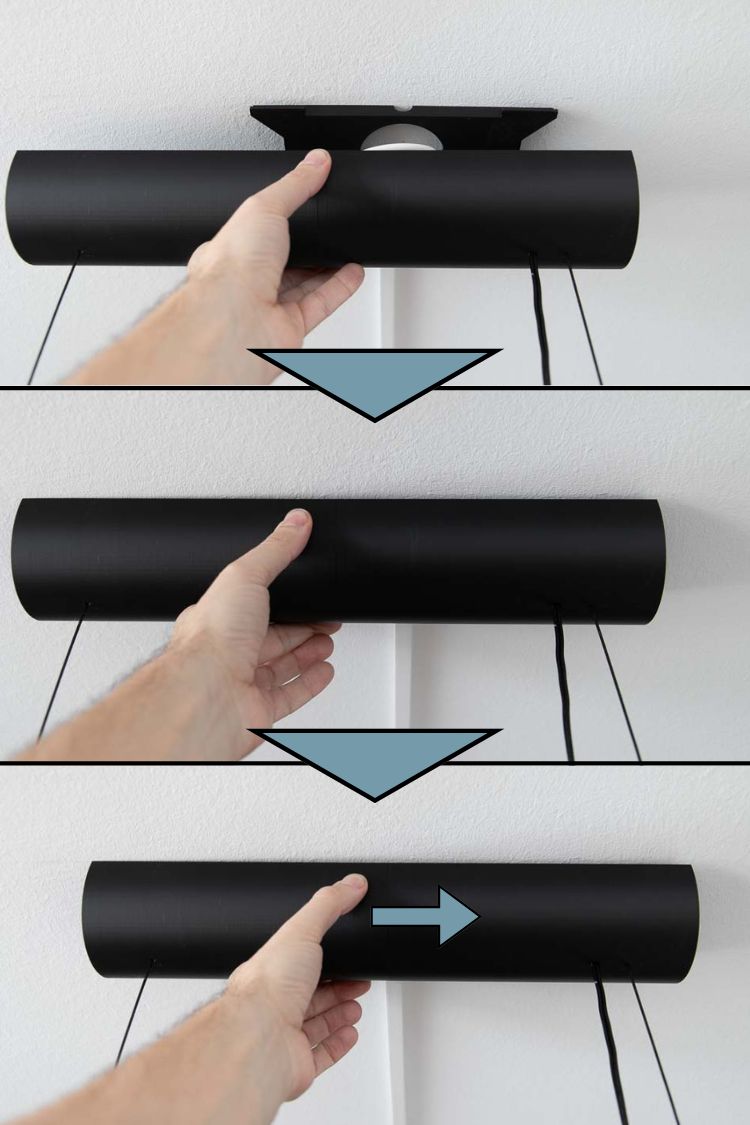
Here the fastening process is shown and described again in three steps:
- Place the ceiling panel about 5 cm off-center under the mount.
- Push the ceiling trim up to the ceiling over the trim, making sure that all cables are in the panel and none are pinched.
- Then push the ceiling trim towards the center. The retaining claws on the mount and panel then interlock, and the pendant lamp is securely mounted on the ceiling.
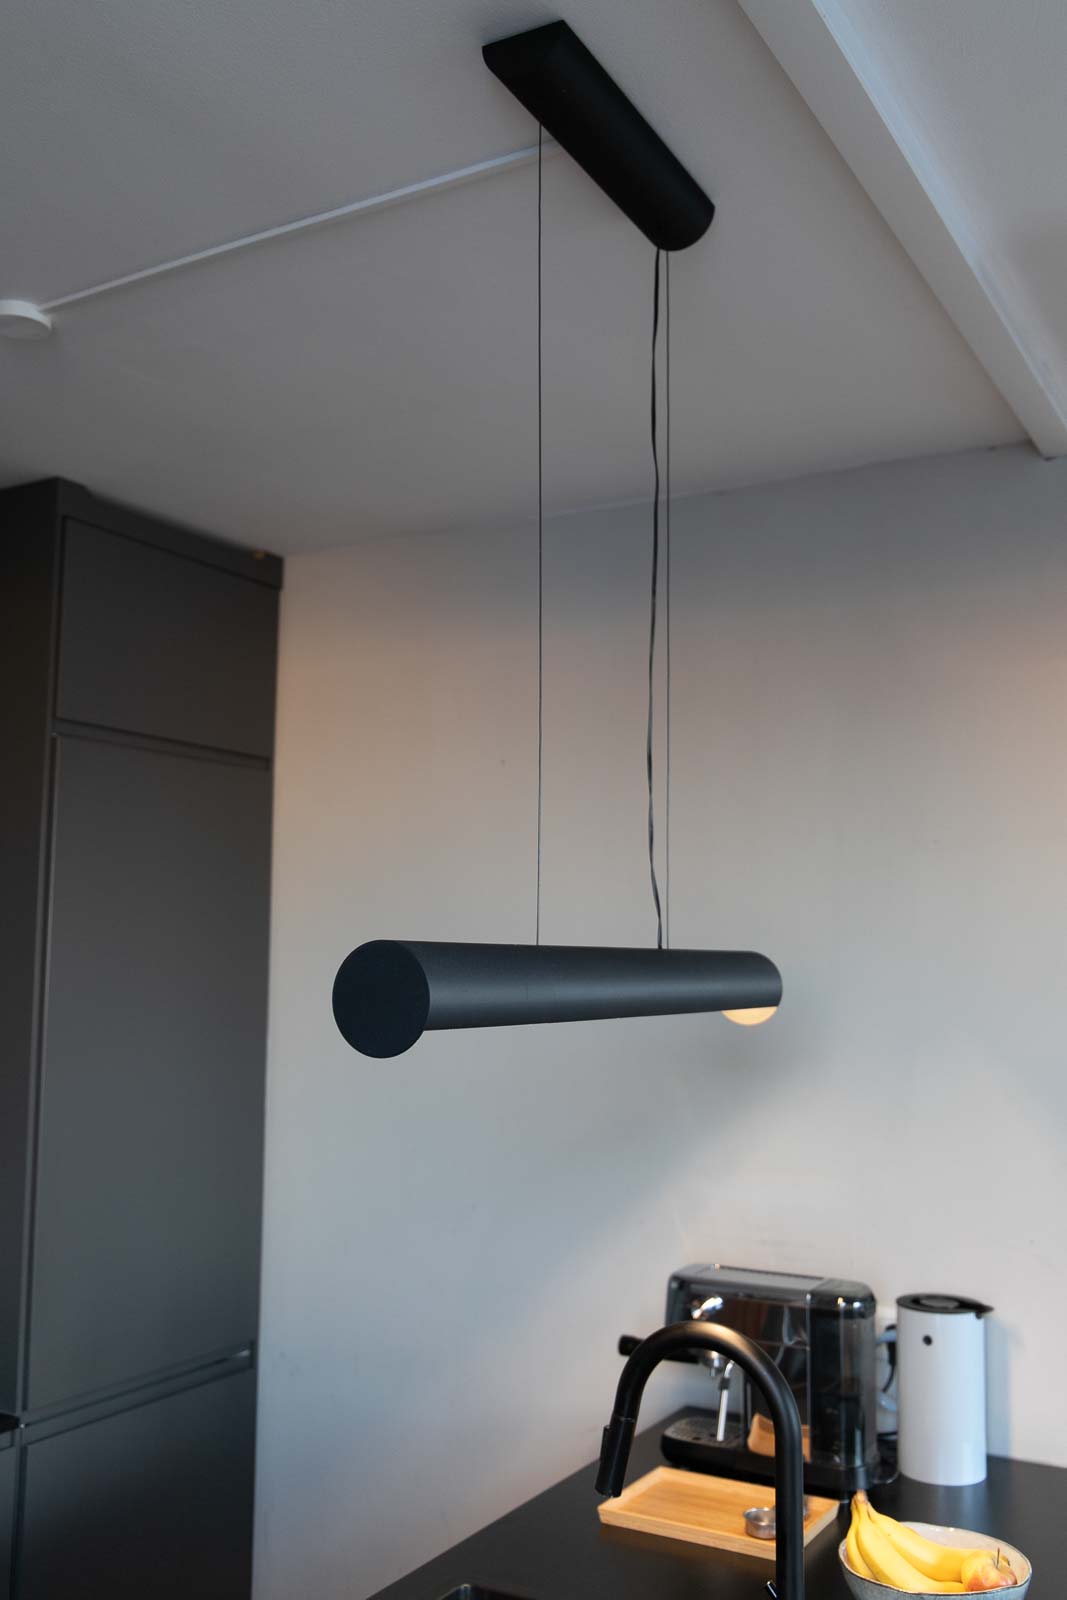
Perfect, the 3D printed pendant lamp is fully assembled and hangs beautifully in your home.
Congratulations, your beautiful 3D printed designer lamp is hanging and can be admired by you and your guests! Hope you had fun with the project and will enjoy the suspending light for a long time 🙂
Below are a few more photos of the fully assembled DIY 3D print pendant lamp.
Disclaimer
The instructions and the associated files are an inspiration of Ingenieurbüro Dr. Janko GmbH to build this project yourself. Since Ingenieurbüro Dr. Janko GmbH has no way of checking and influencing the required quality of the printed components and purchased parts as well as the quality of the assembly and the correct functioning of the project or if any inadmissible changes and modifications to the project has been made, Ingenieurbüro Dr. Janko GmbH accepts no liability for functionality, stability or the damage incurred by the project.
0 Comments