
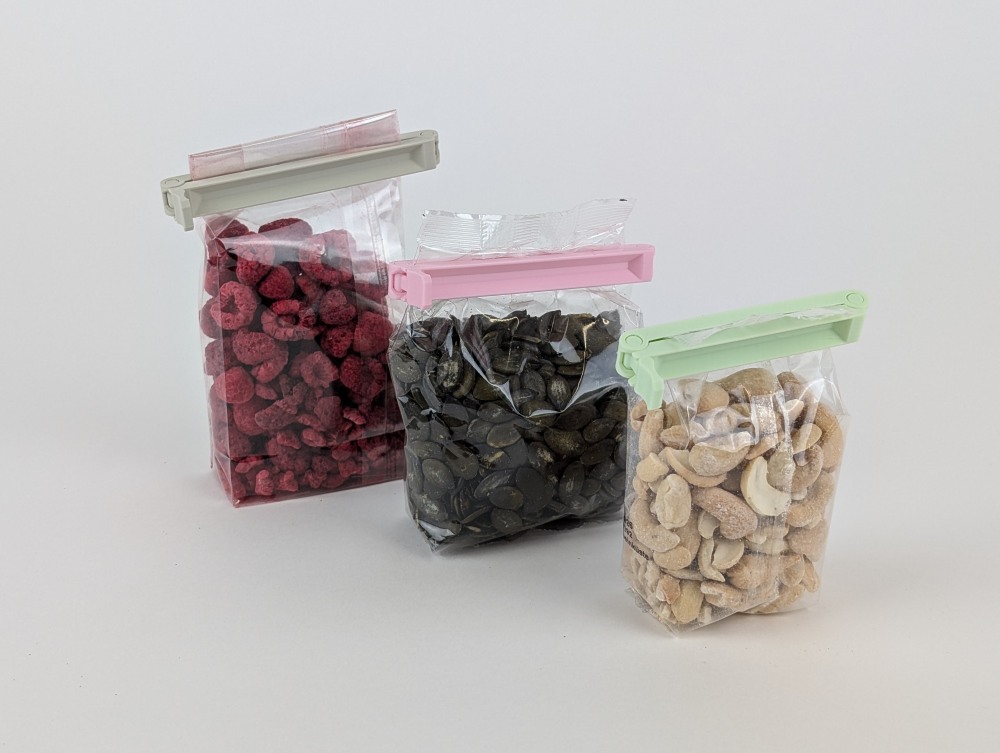
Who hasn’t experienced it: opened packages lying loosely in the cupboard and the content is getting bad? With these stylish and beautifully designed bag clips, you can print your own individual bag seal in no time. The 3D print is super easy and quick to do.
Get the 3D printing files (STL files) in four different sizes, start the print, and get yourself durable, beautifully designed clips that can be used in any kitchen or household. Also perfect as a gift or to show off what your 3D printer can do.
But the best thing about it is surely this: Once you have the files, you can print sealing clips for a lifetime, if some get lost or you no longer like the colors. Depending on the chosen filament, you determine the color of your sealing clips – from discreet and elegant to colorful and eye-catching. For the finished printed clips shown here, I used trendy pastel-colored filaments. All recommended filaments are linked in the following 3D printing guide.
The article contains affiliate links/advertising links, which are marked with an asterisk (*). If you make a purchase through these links, I may receive a commission at no additional cost to you.
3D printed parts
These are purely digital products, you get all the files you need to print the parts yourself in a ZIP folder. It contains the STL files for all required components and variants, as well as additional accessories.
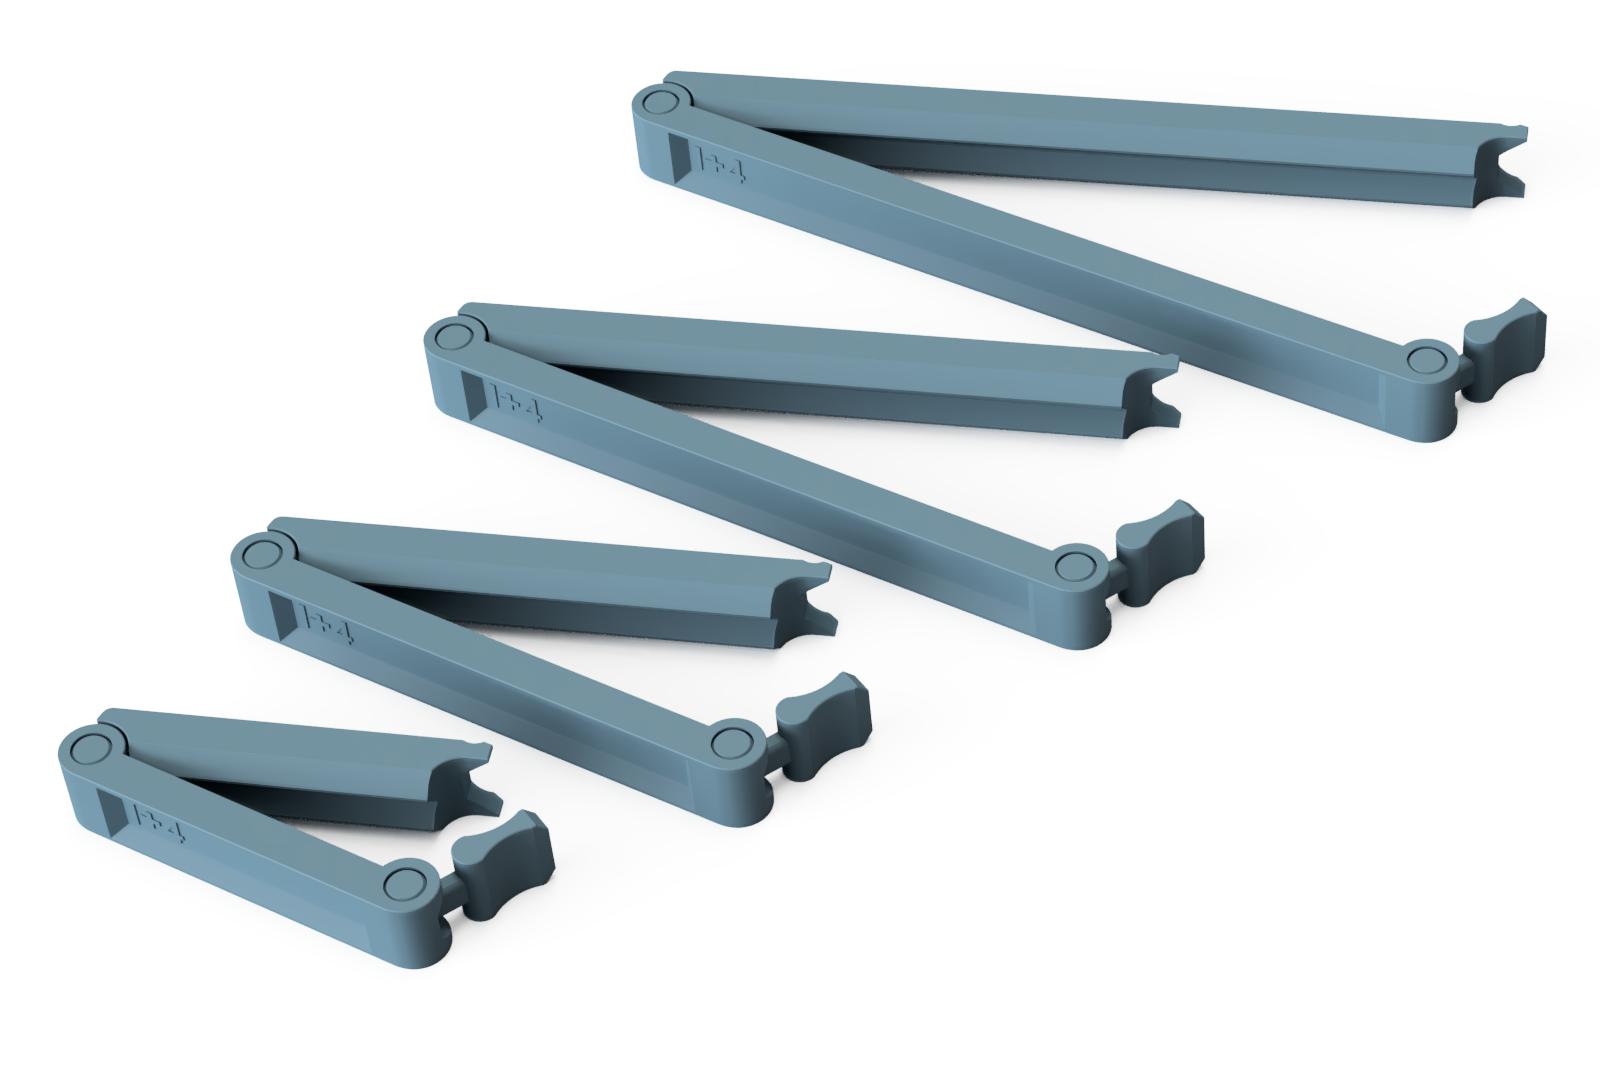
- 015400_Bag_Clip_50mm_I##
- 015500_Bag_Clip_75mm_I##
- 015600_Bag_Clip_100mm_I##
- 015700_Bag_Clip_125mm_I##
- 012200_PrintFit_Turnable_Insert (Test which joint size works best for your 3D printing setup)
The largest model (Bag_Clip_125mm) is 140 x 55 x 12 mm (X, Y, Z) in size. Thus, any standard 3D printer with a build plate of at least 140 x 140 mm is suitable for this project.
PrintFit System (ensuring joints work perfectly on any 3D printer)
Since 3D printers sometimes print slightly larger or smaller than the 3D print model used, it can happen that parts do not fit together or, as in this case, the printed joints in the locking clips are too loose or get stuck because they were printed too tightly.
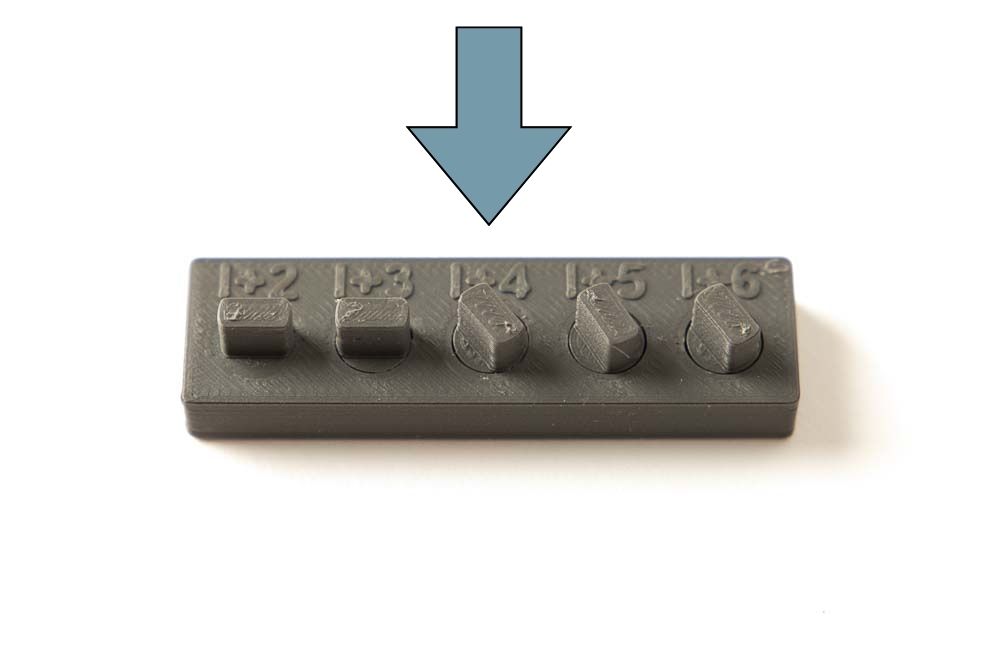
Therefore, for each of the four lengths, there are 5 different STL files, marked with I+2 to I+6 as a suffix in the filename.
This suffix indicates how large the gap is in the print-in-place hinges. For I+2 the gap is very small, for I+6 it is very large. It is best to make a test print with the 50 mm locking clip using the standard gap I+4 and check if the hinges fit well. If they are too loose, print the bag clips with the I+3 suffix. If they are too tight or cannot be moved, then use the STL file with the I+5 suffix.
Alternatively, the small PrintFit tester (012200_PrintFit_Drehbarer_Einsatz) can be printed before the first print to select the optimal STL files. Simply print the PrintFit_Drehbarer_Einsatz with the same print settings and filament that will be used later. After printing, test which inserts can be rotated and select the one that rotates well but is not too loose. Above each rotatable insert, it states what the gap size is. For printing the locking clips, then simply select the STL file with this designation.
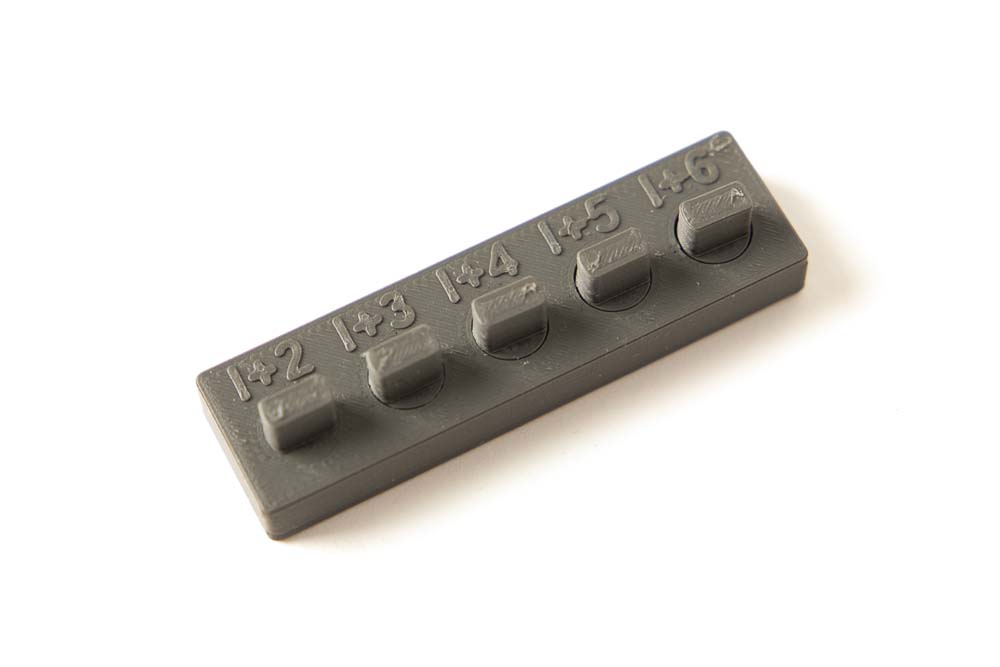
Printed PrintFit_Turnable_Insert tester.
After the rotation test of the inserts, you know which STL file fits your 3D printer, selected filament, and print settings.
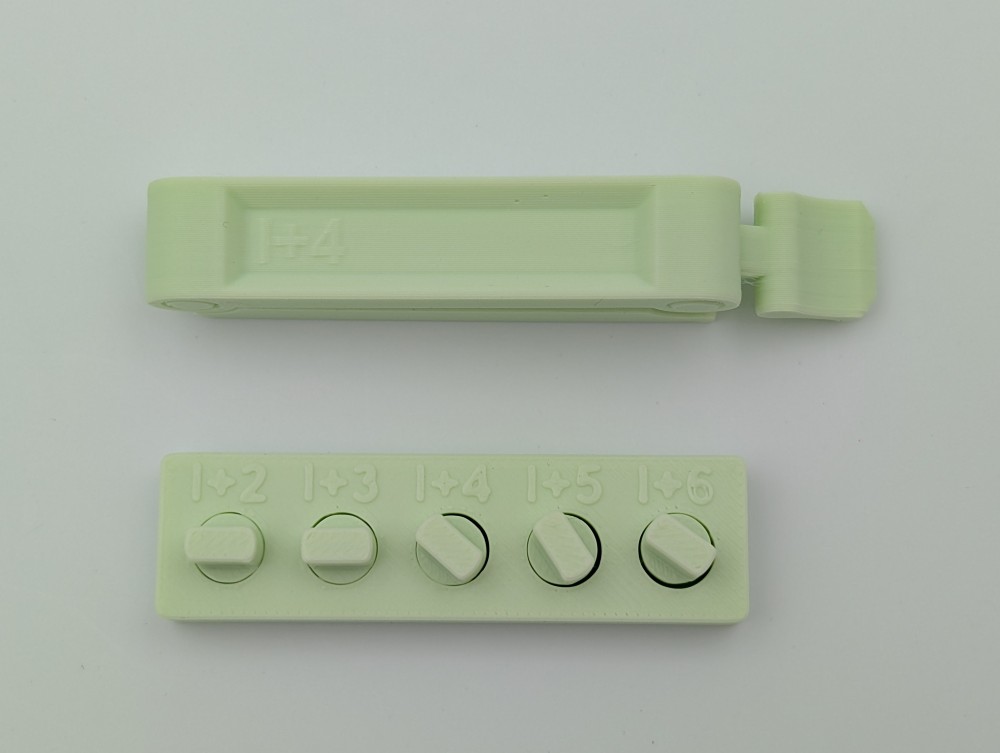
Shown here is the printed tester, after the rotation test. The I+4 insert printed in the tester turned well without any rework and was not too loose, which is why the STL file of the locking clip with the I+4 ending was printed.
You can find more information about the system in the article on the PrintFit System.
3D print settings
The bag clips shown here were printed with the following parameters:
- Layer height 0.2 mm and 100% infill (rectangular / rectilinear)
Used 3D printing filament and 3D printer
The bag clips shown in this guide were printed on a Bambulab P2S 3D printer with a standard 0.4 mm nozzle using the following filaments:
- Beige: OVERTURE Matte Beige PLA Filament*
- Pink: ELEGOO PLA matt Sakura Pink* (currently unavailable) – alternatively ELEGOO PLA Filament Pink*
- Mint Green: ELEGOO Matt PLA Mint Green* (currently unavailable) – alternatively DEEPLEE Matt PLA Mint Green*
- Matte Black: 3DJake ecoPLA Matt Black (unfortunately no longer available) – alternatively ELEGOO Matte PLA Black*
With the selected settings, approx. 50 g of filament are consumed per set of four bag closures for 3D printing. At a price of 20 EUR per kilo, this amounts to 1 EUR in material costs for a complete set of bag clips.
The printing time for a set with four different-sized sealing clips is approx. 2 h (Bambulab P2S).

Instructions: Printing 3D sealing clips
Super easy to print, simply load the 3D print models into the slicer of your choice and then send them to the 3D printer. No support structure is required. The contact surface of the sealing clips is so wide that without additional brims or supports they adhere well to the build plate of your 3D printer and are easy to print.
Safety Guidelines
Safety first! Read and follow the assembly instructions!
Read the entire assembly manual carefully and follow all instructions and safety guidelines. If anything is unclear, just reach out to support (support@3d-druck-vorlagen.de).
These instructions are only intended for persons of legal age (over 18 years old). If you lack knowledge in handling the tools or processes that occur, then it is essential to seek the help of trained persons. The preparation and assembly of the project is at your own risk.
3D printing of the parts
3D printing is very simple. The STL files are already correctly oriented and just need to be placed on the build plate in the slicer. Below, the 3D printed parts in different sizes are shown on the build plate of a Prusa i3 MK3S.
3D printed parts
From right to left, the following parts are printed on the 3D printer’s build plate:

- 015400_Bag_Clip_50mm_I## (PrintFit)
- 015500_Bag_Clip_75mm_I## (PrintFit)
- 015600_Bag_Clip_100mm_I## (PrintFit)
- 015700_Bag_Clip_125mm_I## (PrintFit)
Layer height 0.2 mm and 100% infill (rectangular) with 2 perimeters
The locking clips are PrintFit System parts:
The standard 3D printing template is the one with the I+4 ending. If the printed joints are too loose, print the models with I+3. If they are too tight or cannot be moved, then use the STL files with the I+5 ending.
Check out the 3D printed sealing clips again below in various colors and close-ups, as well as shown “in action” :D.

3D printed sealing clamps in pink filament, showing the locking mechanisms in detail.

Bag clips printed in mint green filament.

Sealing clamps for bags 3D printed in pink and beige filament.
Of course, the 3D printed sealing clips can be printed in any color and with any material, for example, with recycled PETG as well.
Below are printed clips made of PLA plastic in the colors: Pink, Beige, and Mint Green.


Next, I’ll show a few more nice photos of the sealing clamps for bags in action. I hope you have a lot of fun with the project and perhaps also with gifting these beautiful and simple clips.


Disclaimer
The instructions and the associated files are an inspiration of Ingenieurbüro Dr. Janko GmbH to build this project yourself. Since Ingenieurbüro Dr. Janko GmbH has no way of checking and influencing the required quality of the printed components and purchased parts as well as the quality of the assembly and the correct functioning of the project or if any inadmissible changes and modifications to the project has been made, Ingenieurbüro Dr. Janko GmbH accepts no liability for functionality, stability or damage incurred by the project.
0 Comments